Requesting a Signing Certificate to access REST APIs using Private Key JWT
Client applications that use the Private Key JWT Client Authentication method require a Signing Certificate. Creating a Signing Certificate is an essential step for enabling access for OAuth 2.0 client applications that connect to Thredd's REST APIs.
This method requires you to generate a Client Assertion, which is a JSON Web Token (JWT) that is signed by your private key. When you request a Signing Certificate, you register a public key with Thredd and can generate a private key for signing assertions to send to the Authorisation Server.
Whether you want to generate a new certificate, or renew or revoke a certificate, you can manage certificates through Thredd Portal.
If you are using Client Secret authentication, you do not need a Signing Certificate. However, if you will connect to Thredd APIs using an mTLS connection, you need a Transport Certificate regardless of the client authentication method you use. For mTLS connections, see Requesting a Transport Certificate for applications using mTLS.
Purpose of Signing Certificates
A Signing Certificate (or Signing Key) is required to create signed messages, for authentication of clients, and non-repudiation and authentication of notifications. To authenticate with Thredd using the Private Key JWT method, you must generate a Client Assertion in the form of a JSON Web Token (JWT) and ensure that your client presents it when requesting an access token from Thredd. You must then include the access token in any calls that you make to the Thredd REST APIs.
When you request a Signing Certificate from Thredd, it registers a public key on Thredd's identity and access management platform, and generates a private key that you store on the Client (your application).
At the start of a TLS session, the Client (your application) presents the signing key during a TLS handshake to prove its identity to the Server (Thredd). This allows Thredd to verify its identity, requiring the Client to sign a message with its private key, which remains securely stored on the Client. If the signature matches, the Server trusts the Client and generates a temporary secure token for access to the APIs. This ensures message integrity, because only the holder of the private key can sign data.
You must use certificates from Thredd to connect to Thredd APIs. Using self-signed or third-party certificates may result in Thredd refusing connections.
Certificate Lifecycle Management
Regularly rotating (refreshing) your certificate is essential to maintain secure communication between your applications and the Thredd platform. Thredd sends an email to you when a certificate is approaching its expiry date, notifying you 60 days in advance. If you want to renew a certificate, you should request a new Signing Certificate and rotate it before the date that it expires. This ensures that your application can continue to access Thredd applications.
You can also revoke a certificate at any time by logging in to Thredd Portal and choosing the option to revoke it in the Certificates tab of your application. If you submit a request to revoke a Signing Certificate, Thredd fulfils it instantly.
Summary of the steps
The steps for obtaining a certificate are as follows:
- Log in to Thredd Portal and select or create the application that requires a certificate.
- Create a private key and Certificate Signing Request for a new Signing Certificate.
- Upload the Certificate Signing Request for your application.
- Download the certificate for your application.
- Store the private key on your client and ensure it can use the Signing Certificate.
Prerequisites
-
You must have access to Thredd Portal.
-
You must have an Admin role in Thredd Portal.
-
You must have installed OpenSSL on the machine (the Server) that will make requests to Thredd platform (the Client).
-
Your organisation has an application in Thredd Portal. If you need to create an application, see Creating an Application and OAuth Client.
Step 1: Log in to Thredd Portal and select or create the application that requires a certificate
Log in to Thredd Portal and select System Admin. From the System Admin menu, select Applications. You will have access to at least one organisation for your parent company. The Applications screen lists any applications that are registered in Thredd Portal.
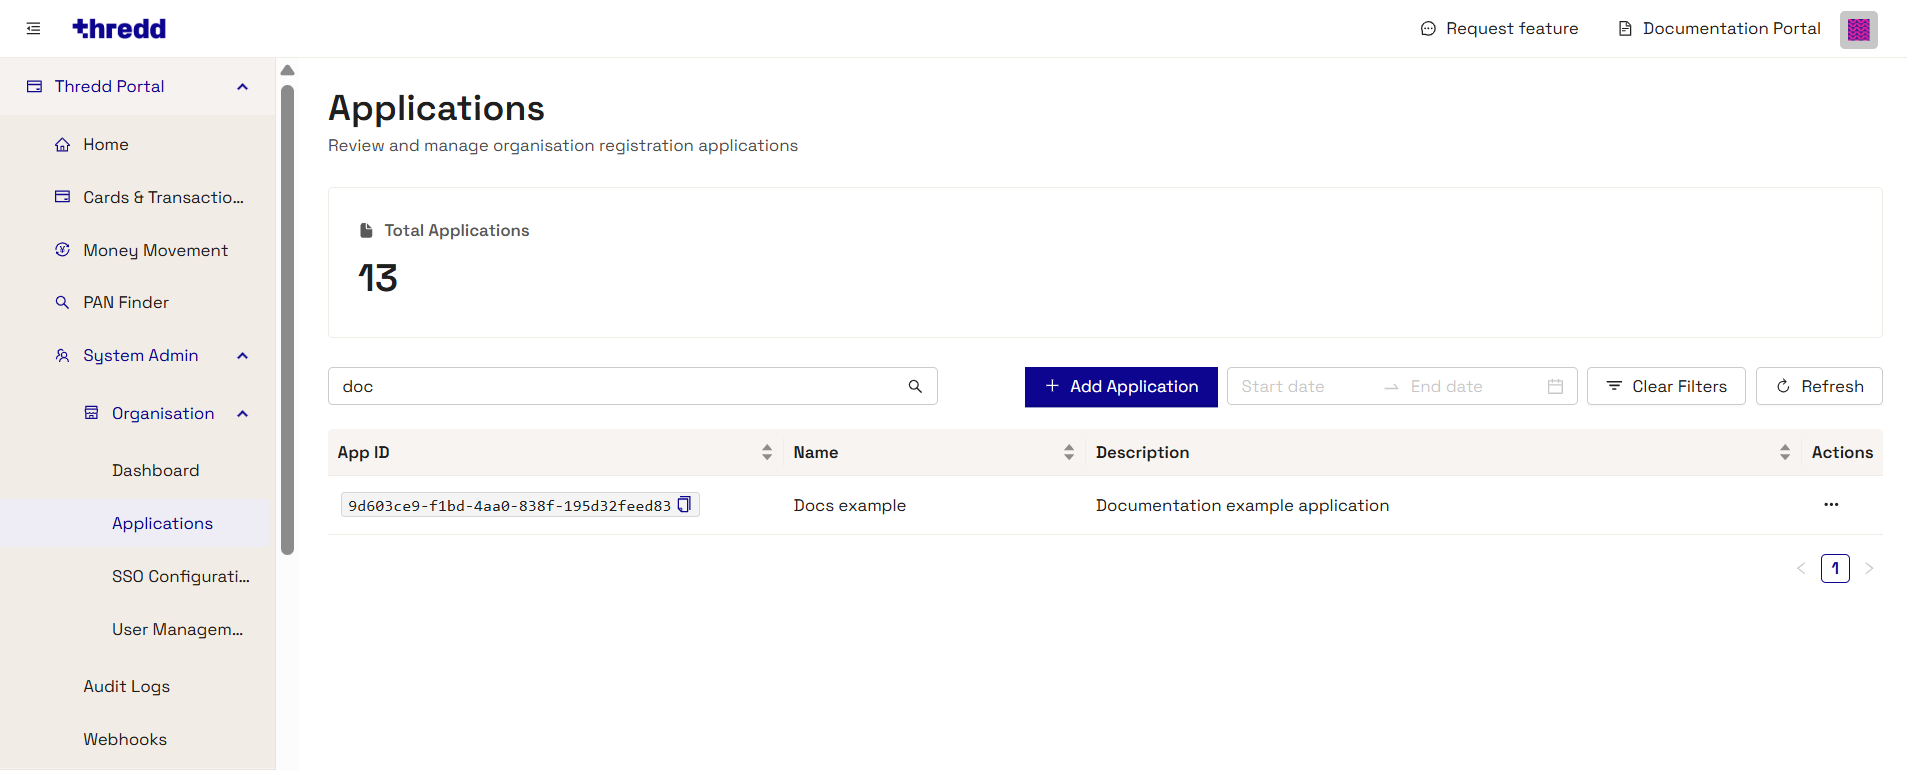
If an existing application is already present and you want to create a signing certificate for it, do the following:
-
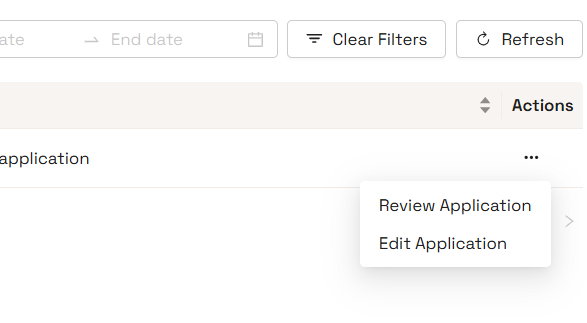
Select the Actions menu (three dots) and select Review Application.
-
The application summary appears and displays the OAuth Clients screen. Select the Certificates tab. See step 2 to create a certificate.
If you need to create a new application, you can do so by selecting the Add Application button. Follow the on-screen prompts to create the application, and then create an OAuth Client for it. For a full guide, including an explanation of the different Application Types and their associated Security Configurations, see Creating an Application and OAuth Client.
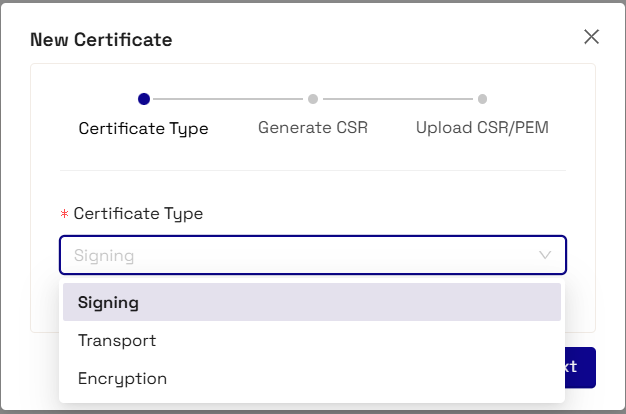
Step 2: Create a private key and Certificate Signing Request for a new Signing Certificate
Make sure you are in the application summary for your application, and do the following:
-
Select the Certificates tab.
-
Select the New Certificate button. The New Certificate screen appears.

-
Select Signing from the Certificate Type dropdown menu, and then select Next.
-
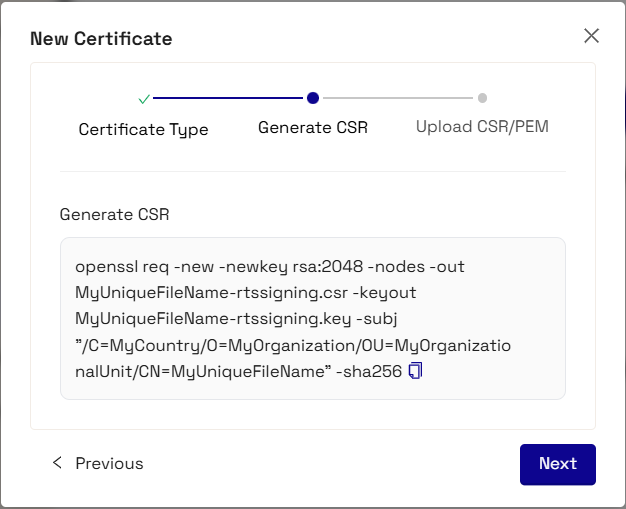
Copy the OpenSSL command from the clipboard and run the command on the machine that you have installed OpenSSL on. This command creates a private key and a Certificate Signing Request (CSR). You must store the private key securely.
Example:
openssl req -new -newkey rsa:2048 -nodes -out MyUniqueFileName-rtssigning.csr -keyout MyUniqueFileName-rtssigning.key -subj "/C=MyCountry/O=MyOrganization/OU=MyOrganizationalUnit/CN=MyUniqueFileName" -sha256This example contains placeholder values, but the command that you copy contains your unique file name for .csr (-out) and .key (-keyout), and organisation information in the certificate subject (-subj).
-
Once you have successfully created the private key (.key) and CSR (.csr) files, select Next.
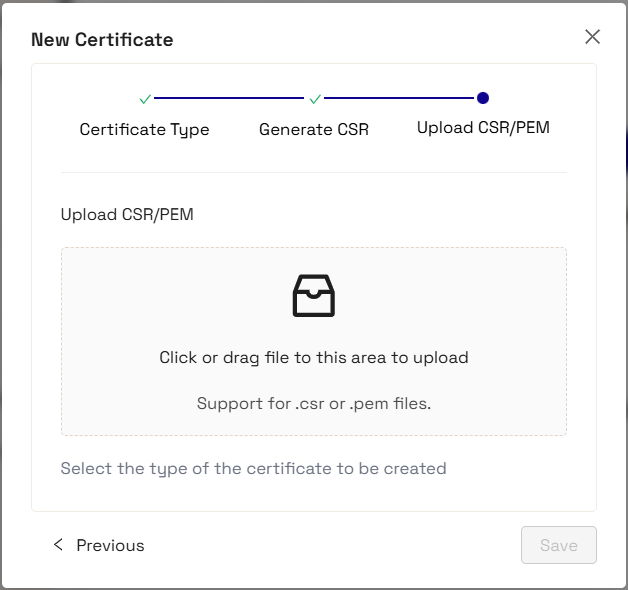
Step 3: Upload the Certificate Signing Request for your application
-
Select the Upload CSR button and select your Certificate Signing Request file. This uploads your Certificate Signing request onto the Thredd platform, so that it can use the file to request the Signing Certificate from the Thredd Certificate Authority (CA).
-
Select Save.
If this is successful, Thredd's system adds the newly-issued Signing Certificate to your application and displays the Key ID (KID) in your certificates list. You can verify this in the App Certificates screen of the Certificates tab for your application.
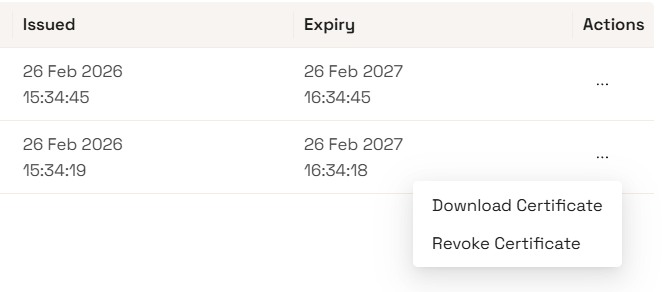
Step 4: Download the certificate for your application
Next, download the certificate from the App Certificates screen.
Select the Actions menu (three dots) next to the SIGNING certificate, and select Download Certificate.
Step 5: Generate a Client Assertion using your registered private key
Your Signing Key is now registered with Thredd's identity and access management system.
-
The public key is available on your organisation's corresponding JSON Web Key Set (JWKS) endpoint.
-
You must store the private key securely on your Client and use it to authenticate when calling Thredd's OAuth token endpoint.
To authenticate with Thredd, you must generate a Client Assertion in the form of a JSON Web Token (JWT) and ensure that your client presents it in all calls that it makes to the Thredd REST APIs. This token is signed with the private key that you registered when you created the Signing Key when you requested the Signing Certificate. You can use the following example of the JWT structure to use.
Required JWT structure
-
iss (Issuer): Your unique Client ID for your client application.
-
sub (Subject): Your unique Client ID (same as the issuer).
-
aud (Audience): The URL of the Thredd Authorisation Server token endpoint at
www.threddid.com/oauth2/token -
jti (JWT ID): A unique identifier for the token to prevent replay attacks.
-
exp (Expiration): A timestamp indicating when the token expires (typically set to 5 minutes from generation).
Signing the token
You must ensure that JWTs are signed using your private key. To understand how to do this for your setup, refer to your Client library documentation.
Most programming languages have well-supported libraries that handle the main aspects of creating and signing a JWT.
Next steps
Once you have configured your Client to use the Signing Certificate/Key to create a JWT, you can begin setting up your connection to the API Hub using the latest Postman Collection.
-
For TLS connections, see Using the Postman Collection to call REST APIs over TLS.
-
For mTLS connections, you must also request a Transport Certificate and use the mTLS Postman Collection. See Requesting a Transport Certificate for applications using mTLS and Using the Postman Collection to call REST APIs over mTLS.