Setting up EHI for TLS connections and signed payloads
The External Host Interface (EHI) offers a way to exchange transactional data between the Thredd processing system and the Program Manager's externally-hosted systems. All transaction data processed by Thredd is transferred to the external host system via EHI in real time.
EHI provides two main functions:
-
a real-time transaction notification data feed
-
payment authorisation control
Follow these steps to set up the External Host Interface (EHI) to communicate with Thredd using TLS and signed payloads.
Overview of TLS in EHI
In the EHI communication flow, your application is the Server and Thredd is the Client.
When Thredd (the Client) connects to your Server, you must present a Server Certificate to Thredd during the TLS handshake. This allows Thredd (the Client) to verify your certificate. The Server certificate is a TLS certificate (the more modern version of an SSL certificate).
Thredd's EHI messages are digitally signed to ensure their integrity and authenticity. These messages are sent over HTTPS for transport layer encryption using Transport Layer Security (TLS).
Thredd's Public Key Infrastructure (PKI) provides a JSON Web Key Set (JWKS) endpoint that you can use to validate EHI payload signatures.
This allows the Server to receive signed payloads over the secure TLS connection.
Digital Signature Flow
The following diagram depicts the Digital Signature Flow; note that CSR = Certificate Signing Request.

Figure: Thredd PKI Signing Flow
Configuring your Server to use EHI with signed payloads
Summary of the steps you need to complete:
-
Obtain a Server Certificate from a Certificate of Authority vendor and install the certificate on your EHI listening endpoint.
-
Log in to Thredd Portal and obtain the JWKS endpoint details.
-
Integrate with the JWKS endpoint.
-
Implement signature validation logic.
-
Test your EHI endpoint for TLS communication.
-
Provide the EHI endpoint to and inform Thredd that you are ready to use the EHI application.
Prerequisites
-
You must have the Super Admin or Organisation Admin role for your organisation in Thredd Portal.
-
You must have access to Thredd Portal.
Step 1: Obtain and install a Server Certificate
You first need to set up the Server certificate on your EHI server.
-
Obtain a Server Certificate from a Certificate of Authority vendor of your choice, such as Verizon or Digicert or Amazon Web Services.
-
Install the Server certificate on your EHI listening endpoint.
-
Ensure that your Server presents this certificate to Thredd during the TLS handshake.
To understand how to do this in your specific case, refer to your Client library documentation.
Step 2: Log in to Thredd Portal and obtain the JWKS endpoint details
Thredd's Public Key Infrastructure (PKI) provides a JSON Web Key Set (JWKS) endpoint that you can use to validate EHI payload signatures.
A Super Admin user must log in to the Thredd Portal and obtain the JWKS endpoint details.
To view your JWKS endpoint in Thredd Portal:
-
Log in to Thredd Portal.
-
Navigate to the System Admin menu, select Organisation, and then select EHI Configuration.
-
The EHI Configuration page opens. Locate the JWKS endpoint and copy its URI.
The address of the JWKS endpoint should be similar to the following:
https://jwks.threddid.com/{thredd_org_id}
You must replace the placeholder {thredd_org_id} in the example JWKS endpoint URL with your unique organisation ID.
Step 3: Integrate with the JWKS endpoint
Every organisation registered with Thredd's IAM platform is assigned a unique, public JWKS endpoint. You must configure your application to securely access and consume the JSON Web Key Set (JWKS) from Thredd's JWKS endpoint, which exposes all of Thredd's signing keys.</p>
Use the endpoint that corresponds with the environment that you are configuring:
UAT:
Production:
Your security and network teams must ensure that the network environment of the application (that receives EHI messages) has unrestricted outbound access to the provided JWKS endpoint.
Your system must be able to periodically query this public endpoint to retrieve the current public signing keys. Thredd recommends that you implement caching logic to store the keys temporarily to reduce the need to call this endpoint, and define a clear refresh mechanism.
Step 4: Implement signature validation logic
To verify the authenticity and integrity of payloads, for example verifying that payload data has not been altered, you should implement logic to validate payload signatures. Signature validation is conducted at the application layer.
An overview of the logic is:
-
Locate and parse the signature — find the digital signature and associated Key ID (
kid) in theX-Thredd-Signatureheader. -
Retrieve the matching public key — use the kid from the signature to look up the corresponding Public Key from the JWKS endpoint or cached JWKS data.
-
Validate the signature — use the Public Key that your retrieved from the JWKS endpoint or cached data to cryptographically verify the digital signature against the EHI payload content.
-
Successful validation: Guarantees the integrity and authenticity of the payload.
-
Validation failure: Immediately rejects the notification and logs a critical security incident.
-
Step 5: Test your EHI endpoint for TLS communication
When you are ready, test the EHI endpoint with the online SSLLabs tool and OpenSSL. This is to ensure that you can successfully communicate with EHI over TLS.
When you have completed testing, provide the EHI endpoint to Thredd.
You must not provide the EHI endpoint if you have not completed testing.
Test using SSLLabs
- Go to the URL of the tool: https://www.ssllabs.com/ssltest/
- Enter the URL for testing in the SSL Labs test screen test page. For example,
api.thredd.com. The results appear similar to the following:
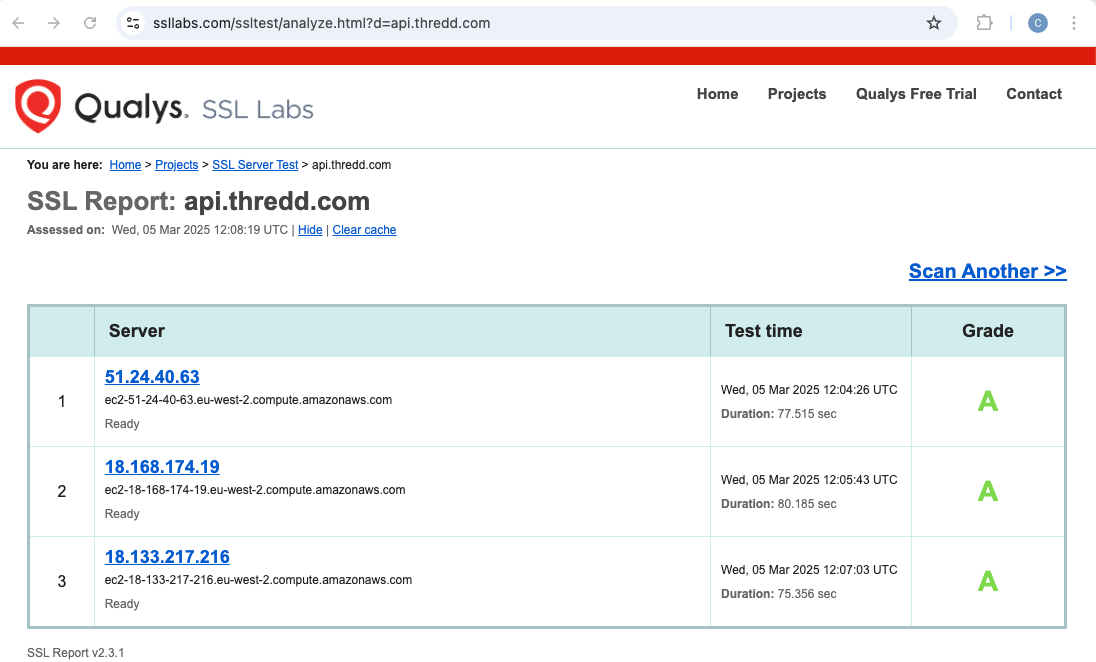
Figure: Passing Tests on SSL Labs
An "A" Grade results in the test passing. However, "B" does not result in a pass, and can indicate that the problem is due to a missing certificate on your Server.
Test using OpenSSL
You should run the following command that triggers the TLS handshake for the communication between Server (you) and the Client (Thredd). You receive a response for the Server certificate.
openssl s_client -connect ehi.yourdomain.com:443Server Certificate result
The results for the Server certificate appear as follows:
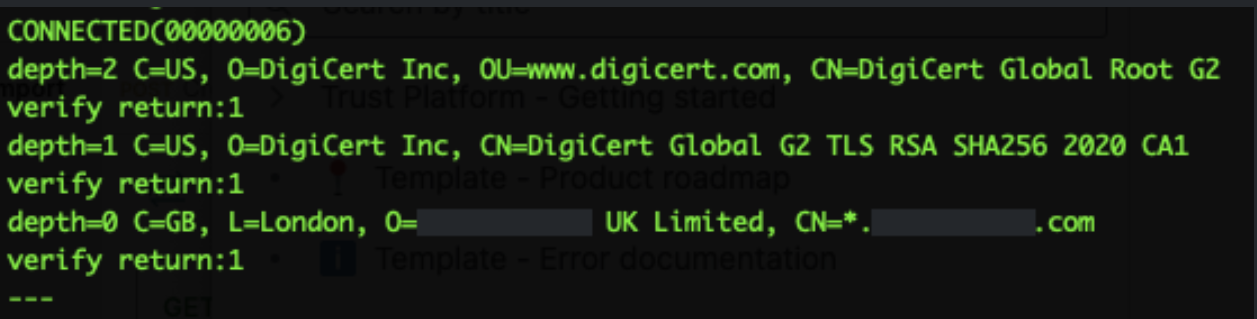
Figure: Server Certificate Result Including Depth Settings
If Depth 0,1,2 all show verify return:1 this indicates that the EHI servers trust the Server Certificate. There could be an issue with Server certificate result, if the results are different; for example, if there is no verify return:1 for the depth settings. The Depth settings mean the following:
|
Depth Setting |
Description |
|---|---|
|
Depth 0 = Root |
The Root certificate has been sent. |
|
Depth 1 = Intermediate: |
The Leaf certificate has been sent. |
|
Depth 2 = Root: |
The Root certificate has been sent. |
You might need to check the EHI listener endpoint configuration if the SSL Labs test does not give an "A" Grade response.
Testing requests without a certificate
For additional testing, you can test a request to the EHI endpoint that does not contain a certificate. Using cURL, you see a 400 or 403 response as in the following example.
# Request
curl -v https://api.yourdomain.com/ehi/endpoint/api
# Partial Response
<html>
<head><title>400 No required SSL certificate was sent</title></head>
<body>
<center><h1>400 Bad Request</h1></center>
<center>No required SSL certificate was sent</center>
Step 6: Inform Thredd that you are ready to use the EHI application
Once you have completed testing, provide the EHI endpoint to Thredd.
You must not provide the EHI endpoint if you have not completed testing.
Thredd confirms to you when you are ready to continue to setting up your integration with EHI. See one of the following guides to learn more about EHI: