5 Unit Tests for AMDL
The Analytics page in the Fraud Transaction Monitoring System enables you to use an offline tester to ensure AMDL expressions are behaving as expected before applying them to a live system. You can attach multiple tests to any AMDL expression for testing your Business Rules. You can create tests for any Rule Set in a Workflow for the AMDL expressions in the Rule Set Condition and in the main AMDL Block.
A test consists of a test event, optional tests on some initial state and the final state once the AMDL has been executed. The tests panel looks as follows:

Figure 2: Unit Tests
The left-hand panel lists all of the tests that are attached to the AMDL expression or Rule Set. You enter the initial state, input event, and expectations in the middle left, middle right, and far right panels respectively. For more information on how to access the AMDL unit test panel, see the Fraud Transaction Monitoring Portal Guide.
You can create:
-
Positive test cases — where an event should cause a rule to trigger, or a state variable or Support Variable to be set to a certain value.
-
Negative test cases — where a rule should fail to trigger or a variable should not be set or updated.
You can save tests alongside the expressions for which they are written, and export or import tests next to your Business Rules.
The Input Event
The most important component of any unit test is the input event. This is the event that
your AMDL is evaluated against. The Input Event panel must contain JSON event
data, and the event must have an eventType field and be of a type that is defined in
your schema. However, the event is not validated against the schema, enabling you to use minimal events containing only the necessary fields, and even test potential schema
changes.
The event generator tool that forms part of the AMDL unit tester lets you generate events that match your schema, and set the values of optional and mandatory fields to create appropriate test cases. Click Event Generator to generate a test event. This ensures that the test event closely approximates the real events that your AMDL will be evaluated against in production.
Expectations
Each test must also define the expected outcome(s) for comparing the result of the test evaluation with the expected result to determine a pass or a fail. These tests are set in different ways depending on whether you are testing rules or other kinds of expression in AMDL Business Rules. For more information, see Testing a Business Rule with a positive test case, Testing a Business Rule with a negative test case, and Testing state and global expressions in AMDL
Initial State
The Initial State panel allows you to define values for any other expressions referenced by the AMDL you are testing. Your unit tests have no access to real entities or a live state, or the values of any other AMDL expressions. Therefore, you must define values for any referenced state or global variables, transient variables, static values, data lists or support variables that you want to have a value in your test.
State and other variables are defined in exactly the same way they are in normal AMDL code. However, instead of an expression that evaluates to a value, you must set any variable to a fixed value in the Initial State panel. For example, you could set the value of a transient variable as follows:
var.exampleOfATransientVariableMyAMDLReferences: 12345For static values (the "values" scope; see Static Values), you can simply copy and paste the values expression into the Initial State panel.
You can set the value of multiple different variables in various scopes by simply placing each expression on a separate line. For example:
var.exampleOfANumericalVariableMyAMDLReferences: 12345
var.exampleOfAStringVariableMyAMDLReferences: "my string"
values.exampleOfACollection: [ "a", "collection", "of", "strings" ]
Entities in Unit Tests
If you have expressions that refer to the state of multiple different entities or entity
types, you can set values for these state expressions in the Initial State panel using an
annotation specific to unit tests, @entitytype. This annotation takes two named
arguments, the entity type (type) and the entity ID (id), although the entity ID is
optional. Any state expressions defined below such an annotation in the "Initial State"
panel belong to the entity specified in the @entitytype annotation.
For example, to specify the value of the state expression avgTxValue for a merchant
entity with the entity ID "merchant1":
@entityType
(type="merchant", id="merchant1")
state.avgTxValue: 100
5.1 Testing a Business Rule with a Positive Test Case
Consider the following rule, which is similar to one you introduced in Example 4: Timestamps and Durations and Conditional State:
@alert
@eventType("transaction")
rules.testTransaction:
event.amount.baseValue > 100 &&
state.previousTransactionValue < 10 &&
event.eventTime - state.previousTransactionTime < 2h
There are a number of test cases you might want to create in order to ensure that this rule works correctly. The simplest is the positive case — a transaction event where the value is greater than 100, the previous transaction value was less than 10, and the previous transaction was less than 2 hours ago.
You first need to create the input event. For the positive test
case, this means a transaction event where the value of amount.baseValue is greater
than 100 (e.g. 150). The event is automatically generated with an eventTime equal to
the current time. When creating the event, you can leave the placeholder values in all the other fields (similar to the following).

Figure 3: Positive Test Case
You also need to specify the values of the state
expressions referenced in the rule for the positive test case. You can do this in the Initial State panel. The correct
value of state.previousTransactionValue only needs to be less than 10.
You also need to set state.previousTransactionTime to a date-time less than two
hours ago by copying the date-time from the input event,
which is 9:55 am on 13th Dec 2019, represented in ISO 8601 format as
"2019-12-13T09:55:56.922Z". By reducing the hour by one, you can set the previous
transaction time to 08:55 on the same day, and create a case in which the rule should
trigger. This Initial State is shown below.

Figure 4: Positive Test Case
The final step in creating this test is to set the expected outcome. In this case, the rule should trigger, so you select "Check triggers" from the "Check rule" dropdown at the top right of the tests pane.

Figure 5: Check Triggers
Once the test is created, you can name this test and run it.
5.2 Testing a Business Rule with a Negative Test Case
While it's important to test that your rule triggers, you should also test when rule doesn't trigger in conditions where you anticipate it to generate an alert.
For the rule above, you can identify three cases to test:
-
Transaction value is less than 100
-
Previous transaction value is greater than 10
-
Previous transaction time is more than 2 hours ago
To create a negative test case, you can duplicate the first test and then edit it (once you've created your first positive test case). By duplicating the positive test case, you can create each of the three negative test cases by:
-
Changing the amount in the input event to 90
-
Changing the value of
state.previousTransactionValueto 11 -
Changing the time of
state.previousTransactionTimeto 06:55 (i.e. change the date-time to "2019-12-13T09:55:56.922Z")
For each of these tests, you also need to change the "Check rule" setting to "Check does not trigger".

Figure 6: Check Does Not Trigger
You can test if the case where one or more of the state expressions referred to in the rule has no value (for example, when this is the first transaction for this particular entity). In the case of an optional field, you can test where the event data field referred to is not present.
You can create a simple test case of this kind by duplicating the initial positive test case,
and deleting the expressions state.previousTransactionValue and
state.previousTransactionTime from the Initial State panel. This action simulates the
behaviour of the rule on the very first transaction for any given customer entity. You also need to change the
"Check rule" setting to "Check does not trigger", as the rule
should not trigger when these state variables are undefined.
Note that in this case, the rule stops executing when it reaches the reference to an undefined state. This results in a case where the rule doesn't trigger, and hence the test passes. However, the test results will also contain a warning that the rule did not execute. Whilst this is expected behaviour, a rule that fails to evaluate returns null when referred to in another expression (for details of the consequences of this, see Rule References).
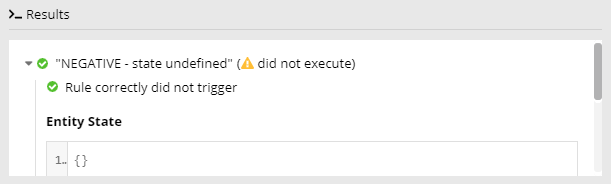
Figure 7: Rule not triggered
5.3 Testing State and Global expressions
You can also test that state and global expressions are updating as expected. For instance, you can test the state expression introduced in Example 4: Timestamps and Durations and Conditional State, which store the date-time of the most recent low-value transaction:
@eventType("transaction")
state.previousLowValueTransactionTime:
event.amount.baseValue < 10 ?
event.eventTime
There are two cases to test with this expression: Storage of the date-time of the transaction if the value is less than 10, and whether the stored value remain the same if the value is greater than or equal to 10,
As with rule testing, you provide some initial state and an event. When testing state and global expressions, however, rather than using the "Check rule" dropdown list, you instead use the Expectations panel. The Expectations panel must contain one or more AMDL rules, for evaluation after the input event is processed. These rules check that the final state is equal to the expected value. If all the rules in the Expectations panel trigger, the test passes. If any of these rules fail to trigger, the test fails. The names of these rules must be unique within the scope of a specific test, but can be repeated across multiple tests for the same entity.
For the first test case, you can set an initial value for the state you are testing, or simply leave the Initial State blank. The input event should be a transaction with a value less than 10.
state.previousLowValueTransactionTime:
"2019-10-15T12:34:56Z"
In the Expectations panel, you then write a rule that tests whether the final value of the state is what you expect it to be. In this case, the same as the date-time of the input event. You can copy the date-time directly from the input event JSON when creating the rule, giving something like this:
rules.newDateTimeSet:
state.previousLowValueTransactionTime == "2019-12-13T11:21:12.702Z"
Note that in the test results, the name of this rule is displayed, and if the rule triggers, a green check-mark is shown next to it. The final value of the state you are testing is also shown. Using a single expectation rule is by far the most common case, but it is possible to add additional rules to this panel to check other conditions to ensure the state was updated correctly.
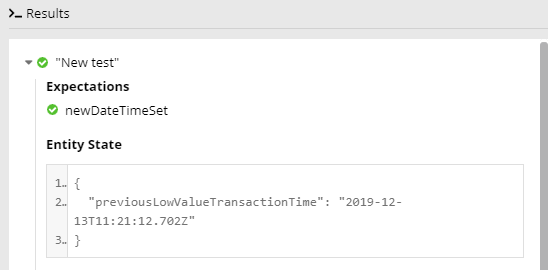
Figure 8: Test case results
You can also add another test to test the second case, where the transaction value exceeds 10. You can do this by duplicating the first test, changing the transaction value in the input event, and updating the expectation rule to check that the value of the state remains unchanged.