10 Managing Chargebacks
A Chargeback is a transaction, that reverses either the entire amount or a portion of a card charge.
Smart Client enables you to view
For Discover, the Chargeback initiation date may be 540 days for certain cases. For example, if the service is for a future date.
For Mastercard transactions only, you can raise chargeback requests to Mastercard and manage your charged back transactions. This service uses the Mastercom API and requires that you first sign up for the service and enable the API data feed via your issuer. You must complete the following prerequisites before the Smart Client Chargeback service can be enabled:
-
Contact your issuer to request they enable Thredd to use the Mastercom API data feed for your BIN codes.
-
Costs for the service must be agreed with your Thredd Account Manager and added as an addendum to your Thredd contract.
For Discover Global Network, you must use the Discover Xchange system to create and manage chargebacks (contact your Discover account manager for login credentials). For more information on the Xchange system, refer to the Xchange User Guide. For more information on Diners Club International chargeback procedures and policies, see the Discover Chargeback Guide, read this guide for information on:
-
Chargeback forms and chargeback policy
-
Retrieval requests
-
Interchange Chargeback Policies
Using Smart Client, you can:
-
View details of existing chargebacks across your programme or for a specific card. See Viewing Chargebacks
-
View details of the transaction linked to a chargeback. See Viewing Linked Transaction Details.
-
View details of the Presentment transaction linked to a chargeback. See Viewing Presentment Details.
Functionality described below is provided for Mastercard only.
-
Retrieve information about a disputed transaction from the acquirer (prior to raising a chargeback). See Creating a Retrieval Request.
-
Raise a chargeback for a single transaction. See Creating a Chargeback.
-
Attach a file to a chargeback. See Uploading Chargeback Documentation.
-
Retrieve documentation previously uploaded for a chargeback case. See Downloading Chargeback Documentation.
-
Withdraw a chargeback. See Reversing a Chargeback.
-
Re-raise a rejected chargeback. See Re-raising a Chargeback.
-
Create a Fee Collection request. See Managing Fee Collections.
-
Send a SAFE report to Mastercom for a fraudulent transaction. See Creating a Mastercom SAFE Report.
You may require access to be set up on your account to view some of these options. Contact Thredd Support for details.
10.1 Creating a Chargeback
Currently supported for Mastercard cards only.
This option enables you to raise a chargeback to Mastercom for a disputed transaction. You can do this with or without attaching documentation.
-
From the Smart Client menu, select Card Activity > View Transactions to view the Transactions screen.
-
From the View Transactions screen, right-click the transaction being disputed by the cardholder and select Actions > Create Chargeback.
The transaction must be in the Presentment state to create the chargeback (i.e., the transaction has been previously authorised, and the funds have been debited from the cardholder’s account).

Figure 59: Create Chargeback menu option
-
From the Chargebacks screen, enter the details of the chargeback. Refer to the table in the section Handling error codes.
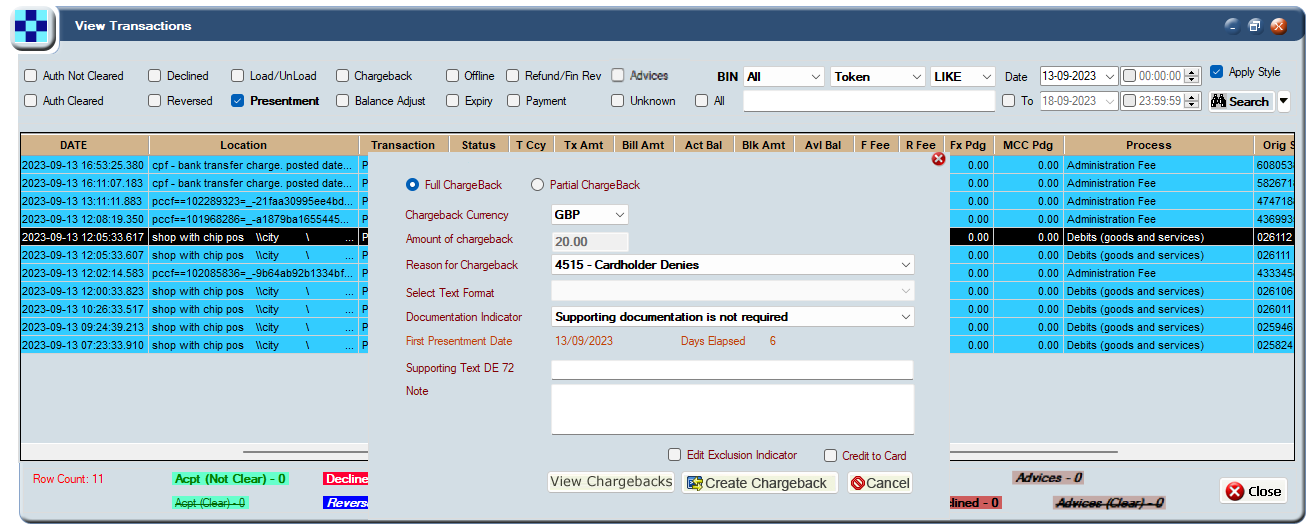
Figure 60: Create Chargeback screen
-
To create the chargeback request, click Create Chargeback.
If all the details provided are correct, then a success response is returned from Mastercom.
If the details provided are not correct, then an error response is returned from Mastercom.
-
If the reason for raising the chargeback is fraud related, Mastercard require you to first raise a SAFE report to report the fraud before raising the chargeback. See Creating a Mastercom SAFE Report.
-
In some specific circumstances, it may be possible to extend the chargeback validity period for a specific transaction, even if it has expired. For details, check with your issuer.
-
Some Program Managers and issuers prefer to refund the cardholder immediately on raising a chargeback, since the chargeback process can take several weeks or months to complete. Note that raising a chargeback does not necessarily mean that the acquirer or Mastercard will approve the chargeback. You may prefer to wait for confirmation before crediting the cardholder.
-
Handling error codes
An error code starting with ‘1’ indicates errors from Mastercom; an error code starting with ‘5’ indicates the error has occurred during Thredd processing of the chargeback request. You can try fixing the details and resending the chargeback request or contact Thredd support.
|
Chargeback Option |
Description |
|---|---|
|
Full Chargeback |
Check this option if you want to dispute the full amount of the transaction. For example, for goods not received or a fraudulent transaction. |
|
Partial Chargeback |
Check this option to dispute a part amount of the transaction. For example, cardholder disputes the billing amount. |
|
Chargeback Currency |
Select the chargeback currency. Depending on the card region, options include the local card billing currency (e.g., GBP) or the international scheme currency used by the card scheme (e.g., USD). The Amount of chargeback field is updated based on the selected currency. |
|
Amount of Chargeback |
Enter the chargeback amount. Up to two decimal places are allowed. If the Full Chargeback option is checked, this field is disabled, and the full amount taken during the Presentment transaction stage is displayed. |
|
Reason for Chargeback |
Select one of the reasons for the chargeback from the drop-down list. For a full list of the latest chargeback reasons, see the Mastercard Chargeback Guide. If the reason is fraud related, you must create a SAFE Report before issuing the chargeback. |
|
Select text format |
The available text format options depend on the Reason for chargeback previously selected. Some chargeback reasons do not provide a default text format. If you are unsure as to which format to select, check with your Account Manager. Depending on the selection, this reason is also populated in the Supporting Text DE 72 field. |
|
Documentation Indicator |
Select how documentation to support this chargeback will be supplied:
Refer to the Mastercard Guide for details of the types of Chargeback Reason Codes that require supporting documentation. |
|
Days Allowed |
Read-only field indicating the number of days allowed to process the chargeback. This varies between region and chargeback reason code. Typical values are 90 days, 120 days, and 540 days. |
|
Days Remaining |
Read-only field indicating the number of days remaining to process the chargeback. If this number is negative, it indicates the period in which to submit the chargeback has been exceeded. If you submit the chargeback, Mastercom will reject it. |
|
Supporting Text DE 72 |
Add a description, to be displayed in the DE 72 field of the chargeback message sent to Mastercom. This field can also be populated with a standard message as selected in the Select Text Format field. |
|
Note |
Free text field to enable you to add an internal note about the chargeback request. This note is not passed on to Mastercom. |
|
Edit Exclusion Indicator |
Check this option to indicate to Mastercom they should ignore the Days Allowed/Days Remaining indicator. This enables you to still raise a chargeback, even if the Mastercard default eligibility period has expired. This functionality is not yet released. Check with your Thredd Account Manager for details. |
|
Credit to Card |
If you check this option, the chargeback amount will be credited back to the card. |
10.2 Viewing Chargebacks
Supported for
Use the Discover XChange system to create chargebacks and manage the chargeback process.
-
From the Smart Client menu, select Card Activity > Chargebacks.
-
In the Chargebacks screen, you can view raised chargeback details for a specific card or for all cards:
-
To query chargebacks for a specific card, in the Token field enter the public token number of the card you want to query.
-
To list chargebacks within a specified date range and status, select the Status and date range and click List.
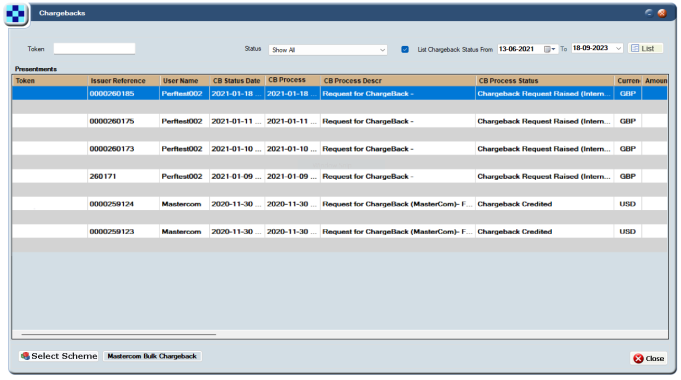
Figure 61: Chargebacks screen
-
-
To view details of the chargeback, use the scrollbar at the bottom-left corner of the screen to scroll through the chargeback transaction table.
-
To perform further actions related to the chargeback, right-click the transaction row. The options displayed depend on the type of card and chargeback status. See the examples below:
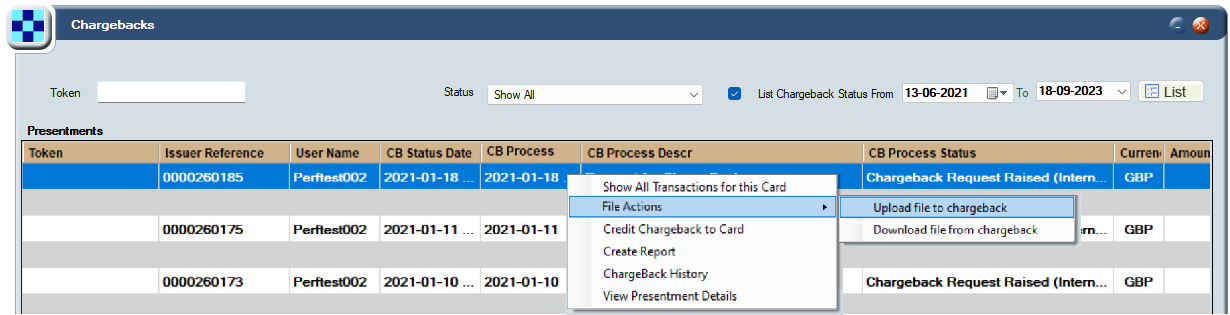
Figure 62: Further actions available on a chargeback
To display details for the specific the card issuer scheme used by your programme, click the Select Scheme button (bottom-left of screen), click Clear All and then check the relevant Card Processing Scheme. This option is only relevant if your programme supports multiple card schemes. Card schemes are also known as payment networks.
10.3 Viewing Chargeback Transactions
This section provides details of options you can use to view and manage the transaction and card that is linked to a chargeback.
10.3.1 Showing all Transactions for a Card
You can display all transactions for a card linked to a chargeback.
To show all transactions for a card linked to a chargeback:
-
From the Smart Client menu, select Card Activity > Chargebacks to view the Chargebacks screen.
-
From the Chargebacks screen, right-click the required transaction and select Show All Transactions for this Card.
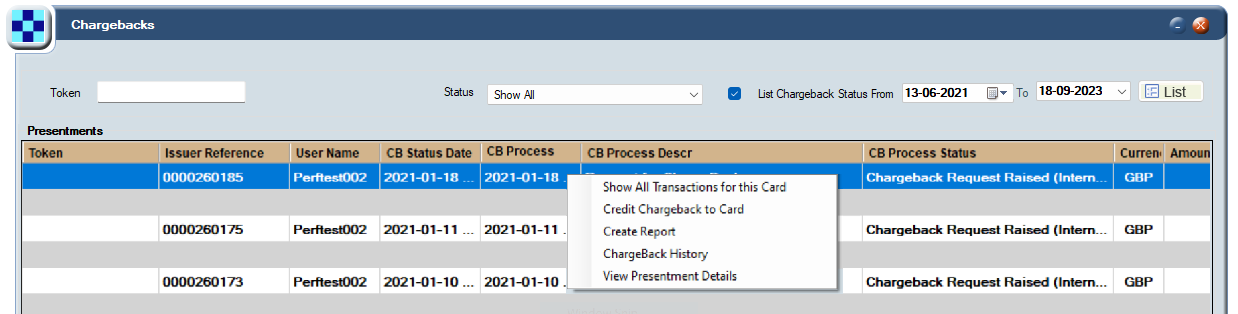
Figure 63: Show All Transactions for this Card option
-
The View Transactions screen appears, with the card’s public token preselected and displaying a list of transactions linked to the card.
10.3.2 Crediting a Chargeback to a Card
This option enables you to manually credit the charged back amount to the cardholder’s account. It is typically used once you have confirmation from the card scheme (payment network) that the chargeback was successful. Note that this is done by clients; not Thredd.
To credit the chargeback amount back to the card:
-
From the Smart Client menu, select Card Activity > Chargebacks to view the Chargebacks screen.
-
From the Chargebacks screen, right-click the required transaction and select Credit Chargeback to Card.
-
A pop-up message is displayed, asking you to confirm. Click Yes. The chargeback amount is credited back to the cardholder’s account.
When creating a chargeback, you can also tick the credit to card option to automatically credit the card. See Creating a Chargeback.
10.3.3 Viewing Linked Transaction Details
This option enables you to view details of the transaction being charged back.
To view further details about the transaction on which you have raised the chargeback:
- From the Smart Client menu, select Card Activity > Chargebacks to view the Chargebacks screen.
-
From the Chargebacks screen, right-click the required transaction and select Create Report. The Transaction Details screen is displayed.
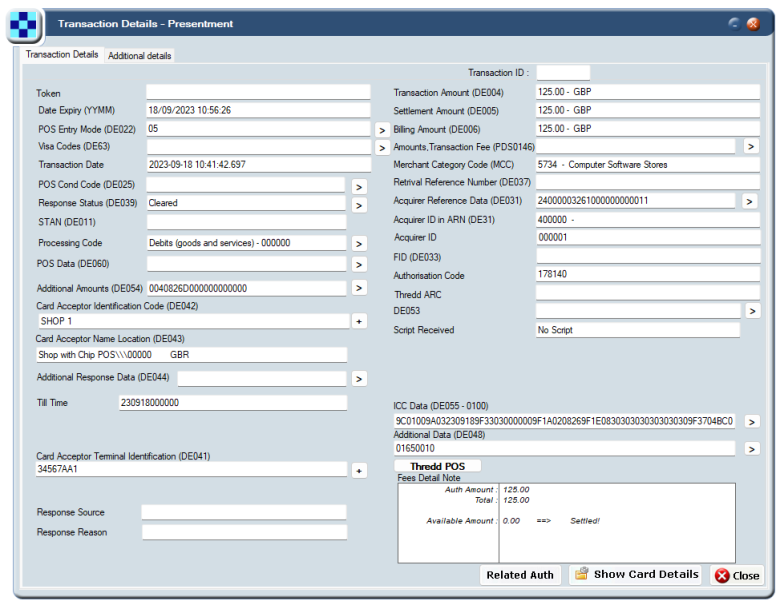
Figure 64: Transaction Details screen
Options displayed on this screen may vary, depending on your version of Smart Client and the fields enabled for your account.
-
Use the buttons at the bottom right of the screen to view further details.
10.3.4 Viewing Presentment Details
You can use this option to view details of the presentment linked to the chargeback.
To view details of the presentment transaction linked to the chargeback:
- From the Smart Client menu, select Card Activity > Chargebacks to view the Chargebacks screen.
-
In the Chargebacks screen, right-click the required transaction and select View Presentment Details. The View Transactions - Presentments screen is displayed, showing details of the linked presentment transaction.
If there is a second presentment, to view details right-click the chargeback and select View Sec Presentment Details.
10.3.5 Viewing Chargeback History
To view the Chargeback history of a chargeback transaction:
- From the Smart Client menu, select Card Activity > Chargebacks to view the Chargebacks screen.
-
From the Chargebacks screen, right-click the required transaction and select Chargeback History. The Chargeback History screen is displayed.
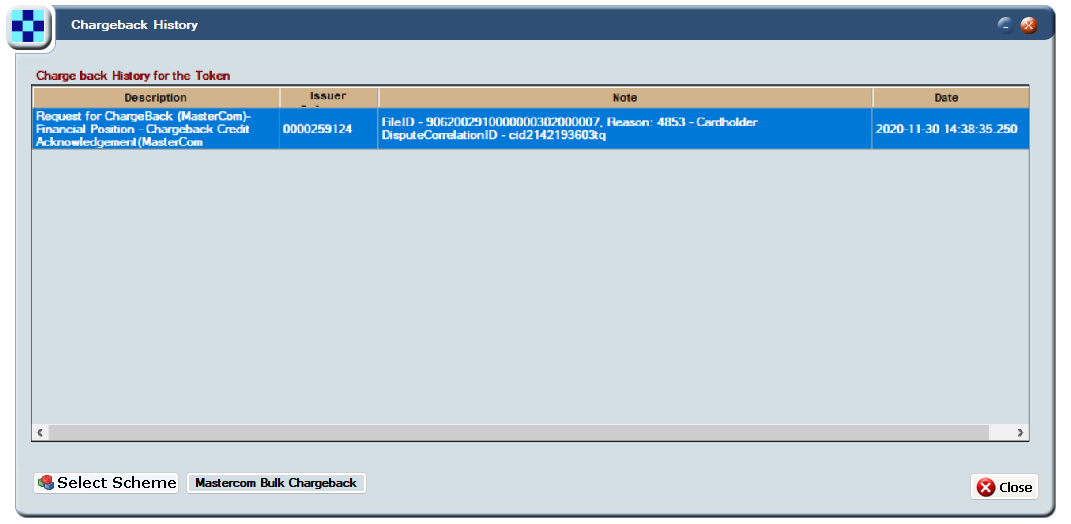
Figure 65: Chargeback History screen
10.3.6 Creating a Retrieval Request
A retrieval request occurs after a cardholder communicates with their issuer to question or dispute a transaction. You can use Smart Client to create a retrieval request from the acquirer for documentation related to a disputed transaction. The acquirer fulfils a retrieval request by sending documentation through Mastercom.
After receiving the retrieval request documentation from the acquirer, you can proceed with the chargeback if required.
Retrieval requests are optional. You can proceed to create a chargeback even if you have not created a retrieval request.
To raise a retrieval request:
-
From the Smart Client menu, select Card Activity > View Transactions to view the Transactions screen.
-
In the Transactions screen, right-click the required transaction and select Create Retrieval Request. The Create Retrieval Request screen is displayed.
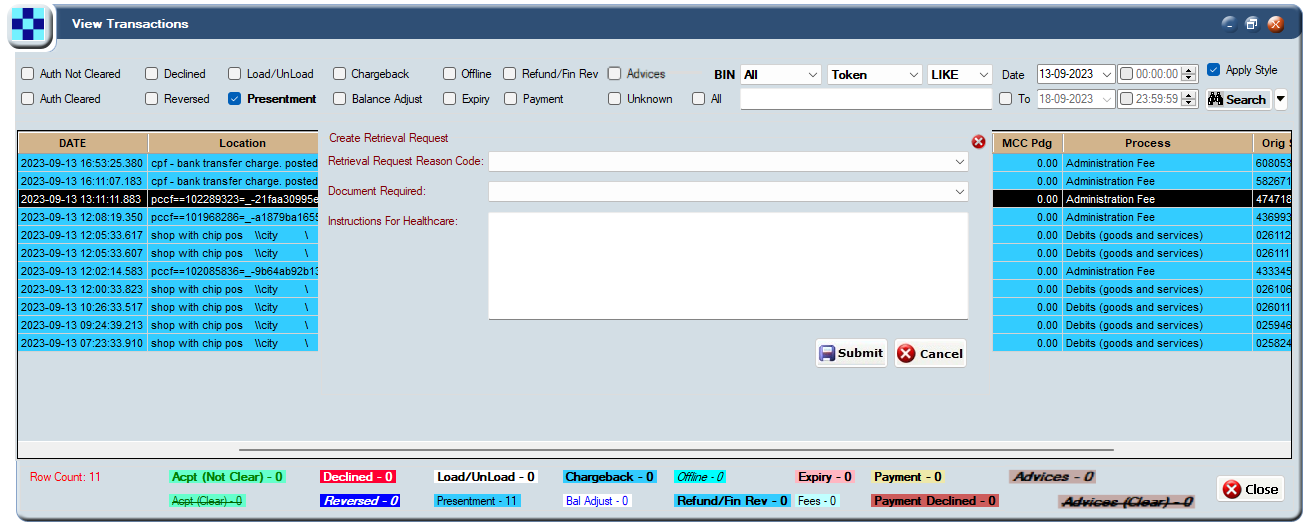
Figure 66: Create Retrieval Request screen
-
In Retrieval Request Reason Code, select an appropriate reason for the retrieval request. For details, see the table in the section Retrieval Request Reason Codes.
-
In Document Required, select the format required. The available options are:
-
Hard copy of the original document
-
Copy or image of the original document
-
Substitute draft
-
-
Click Submit.
A confirmation message is displayed, indicating if the retrieval request was successfully registered with Mastercom. In this case a Request ID and Claim ID are returned, which you can use to track the status of the request. If the retrieval request failed, a message box is displayed, providing details of the error. For example, a request has already been submitted. Please resolve the error and try again or contact Thredd support.
-
To close the message box, click OK.
Tracking the Status of the Request
Once the request has been successfully registered, you can track the status of the request as follows:
-
You can view the new retrieval request raised in the Chargeback screen.
-
Once the acquirer responds to the retrieval requests, to download the documentation, right-click the retrieval request in the Chargeback screen and select File Actions > Get Documentation. For details, see Downloading Chargeback Documentation.
Retrieval Request Reason Codes
The following table contains a list of the available Retrieval Request reason codes.
|
Retrieval Request Reason Codes |
Description |
|---|---|
|
6305 |
Cardholder does not agree with amount billed. |
|
6321 |
Cardholder does not recognize transaction. |
|
6322 |
Request Transaction Certificate for a chip transaction. |
|
6323 |
Cardholder needs information for personal records. |
|
6341 |
Fraud investigation. |
|
6342 |
Potential chargeback or compliance documentation is required. |
|
6343 |
IIAS Audit (for healthcare transactions only). |
|
6390 |
Identifies a syntax error return. |
10.3.7 Reversing a Chargeback
You can use this option reverse a chargeback that has previously been successfully raised and approved by Mastercard. This can be used if you do not want to proceed with the chargeback.
To reverse a chargeback:
- From the Smart Client menu, select Card Activity > Chargebacks to view the Chargebacks screen.
-
From the Chargebacks screen, right-click the required transaction and select Reverse Chargeback.
-
A pop-up message is displayed, asking you to confirm. Click Yes. A confirmation message is displayed, indicating if the chargeback was successfully reversed or if the chargeback reversal failed.
-
To close the message box, click OK. A chargeback reversal message is sent to Mastercom.
10.3.8 Re-raising a Chargeback
You can use this option re-raise a chargeback request that has been rejected. You should try and fix the issue before re-raising the chargeback. There is no limit to the number of re-raise chargeback requests.
To re-raise a chargeback:
- From the Smart Client menu, select Card Activity > Chargebacks to view the Chargebacks screen.
-
From the Chargebacks screen, right-click the rejected chargeback transaction and select Re-Raise Chargeback. The following screen is displayed:
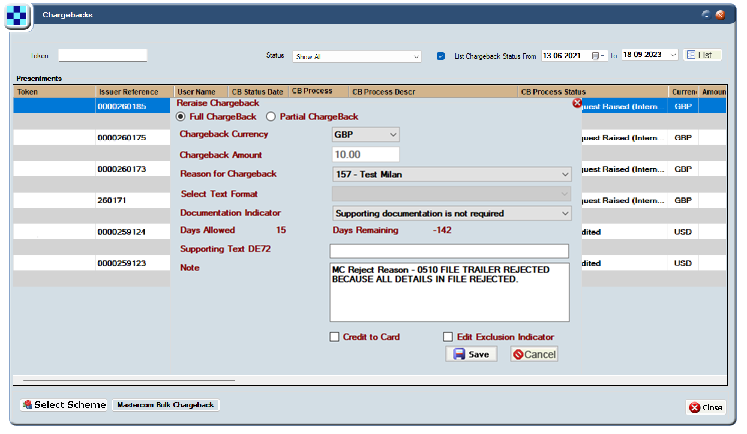
Figure 67: Reraise Chargeback screen
-
Provide all the details as per the instructions in the Creating a Chargeback section and click Save.
The re-raised chargeback requestion is sent to Mastercom. A confirmation message is displayed, indicating if the re-raised chargeback was successful or if the request failed.
10.4 Uploading and Downloading Supporting Documents
10.4.1 Uploading Chargeback Documentation
You can use this option to upload documentation to support a chargeback. The documents will be sent to Mastercom and made available to the acquirer.
If you subsequently upload another file, this will overwrite any previous file uploaded to Mastercom.
To upload supporting documentation for the chargeback:
- From the Smart Client menu, select Card Activity > Chargebacks to view the Chargebacks screen.
-
From the Chargebacks screen, right-click the required transaction and select File Actions > Upload file to chargeback. The following screen is displayed:
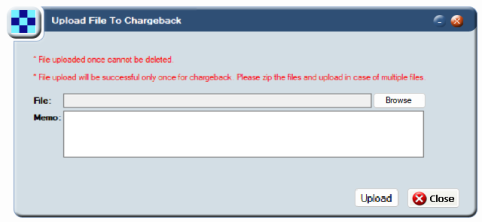
Figure 68: Upload File to Chargeback screen
You can only upload documentation once (single upload only). Therefore, ensure you have all the documents you need before using this option. If you have multiple files to upload, please add these to a zipped file and upload a single zip file. Examples of files you can include are items such as scanned. documents, images, and transaction receipts. Make sure that all documents scanned are clear and legible, and not truncated, or these may be rejected by Mastercard.
-
To select a file to upload, click Browse.
-
In Memo, provide further details of the file being uploaded.
-
To upload your supporting case documentation to Mastercom, click Upload. The uploaded file is sent to Mastercom.
- Once the file is uploaded, it cannot be deleted. However, you can replace this file with another one using the upload option.
- The uploaded file is end-to-end encrypted; Thredd does not have access to the details in the file.
10.4.2 Downloading Chargeback Documentation
You can use this option to view any case documentation which you previously submitted to Mastercom.
To download documentation linked to the chargeback:
- From the Smart Client menu, select Card Activity > Chargebacks to view the Chargebacks screen.
-
From the Chargebacks screen, right-click the required transaction and select File Actions > Download file from chargeback. The following screen is displayed:
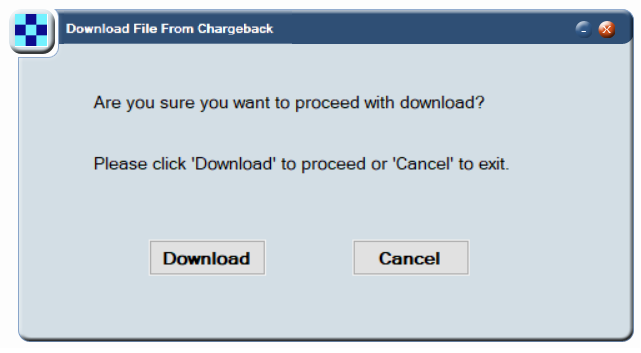
Figure 69: Download File From Chargeback screen
-
To continue with the download, click Download. The file is downloaded to your computer.
the downloaded file is end-to-end encrypted; Thredd does not have access to the details in the file.
10.5 Viewing and Managing Fee Collections
10.5.1 Create a Fee Collection Message
Smart Client supports the sending and receiving of fee collections related to disputes.
-
From the Smart Client menu, select Card Activity > View Transactions to view the Transactions screen.
-
In the Transactions screen, right-click the required transaction and select Create fee collection message. The Mastercom Fee Collection screen is displayed.
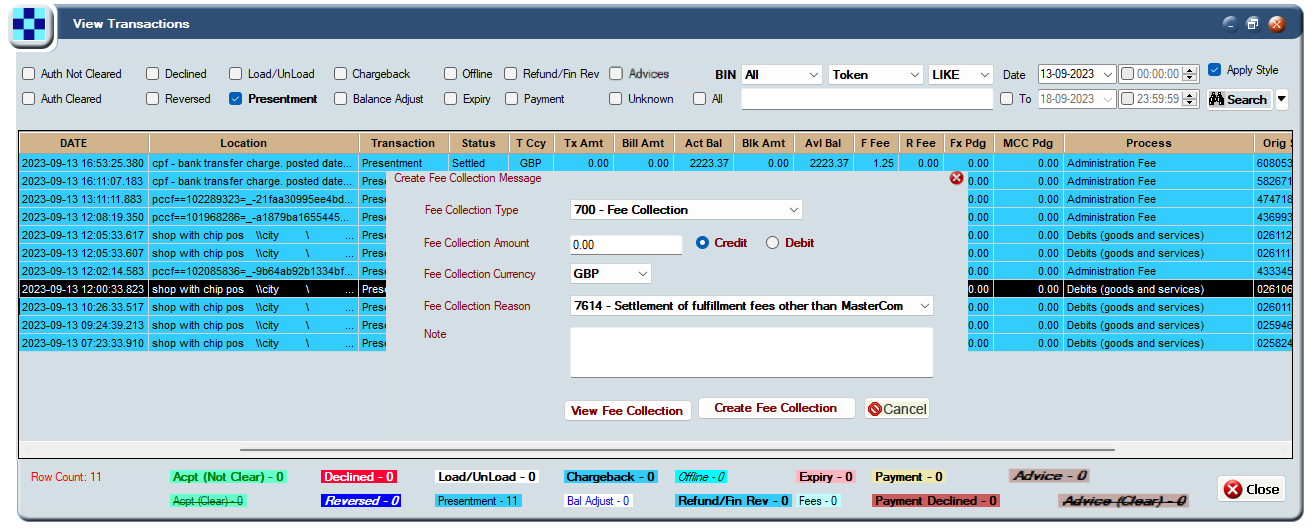
Figure 70: Mastercom Fee Collection screen
About Fee Collections fields
The following table contains information about each of the fee collection fields.
|
Fee Collection Information |
Description |
|---|---|
|
Fee Collection Type |
Select the type of fee collection. Options include:
|
|
Fee Collection Amount |
Enter the fee collection amount. Up to two decimal places are allowed. Tick one of the following options to indicate who to credit the fee to:
|
|
Fee Collection Currency |
Select the currency of the fee. |
|
Fee Collection Reason |
Select the reason for the fee collection (DE 25 Message Reason Code values that apply to the fee collection). |
|
Note |
Free text field to enable you to add a short message about the fee. |
10.5.2 Creating a Mastercom Fee Collection message
Mastercom supports the ability of issuers to send and receive fee collections related to disputes.
For more information about fee collection messages and the fee collection cycle, refer to the Mastercard Global Clearing Management System Reference Manual. (Note: you need a Mastercom account to access this link).
To create a fee collection:
-
From the Smart Client menu, select Card Activity > View Transactions to view the Transactions screen.
-
In the Transactions screen, right-click the required transaction and select Create Mastercom fee collection message. The Mastercom Fee Collection screen is displayed.
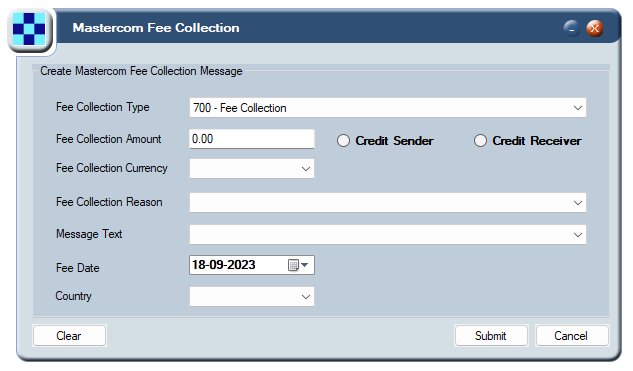
Figure 71: Mastercom Fee Collection screen
-
Provide all the details as per the instructions in the table below and click Submit.
A confirmation message is displayed, indicating if the Fee collection request was successfully registered with Mastercom. In this case a Fee ID and Claim ID are returned, which you can use to track the status of the request. If the fee collection request failed, a message box is displayed, providing details of the error. For example, a request has already been submitted. Please resolve the error and try again or contact Thredd support.
-
To close the message box, click OK.
-
The created fee collection message is displayed in the Chargeback screen.

You can view details of any chargeback fees raised in the Fee Collection screen. See Viewing Fee Collections.
About Mastercom Fee Collection fields
The following table contains information about each of the fee collection fields.
|
Fee Collection Information |
Description |
|---|---|
|
Fee Collection Type |
Select the type of fee collection. Options include:
|
|
Fee Collection Amount |
Enter the fee collection amount. Up to two decimal places are allowed. Tick one of the following options to indicate who to credit the fee to:
|
|
Fee Collection Currency |
Select the currency of the fee. |
|
Fee Collection Reason |
Select the reason for the fee collection (DE 25 Message Reason Code values that apply to the fee collection). |
|
Message Text |
Free text field to enable you to add a short message about the fee. |
|
Fee Date |
Select the date on which the fee collection is requested. |
|
Country |
Select the country where the fee collection applies. |
10.5.3 Viewing Fee Collections
This option enables you to view details of all Mastercom fee collection requests.
-
From the Smart Client menu, select Card Activity > Fee Collection to display the Fee Collection screen.
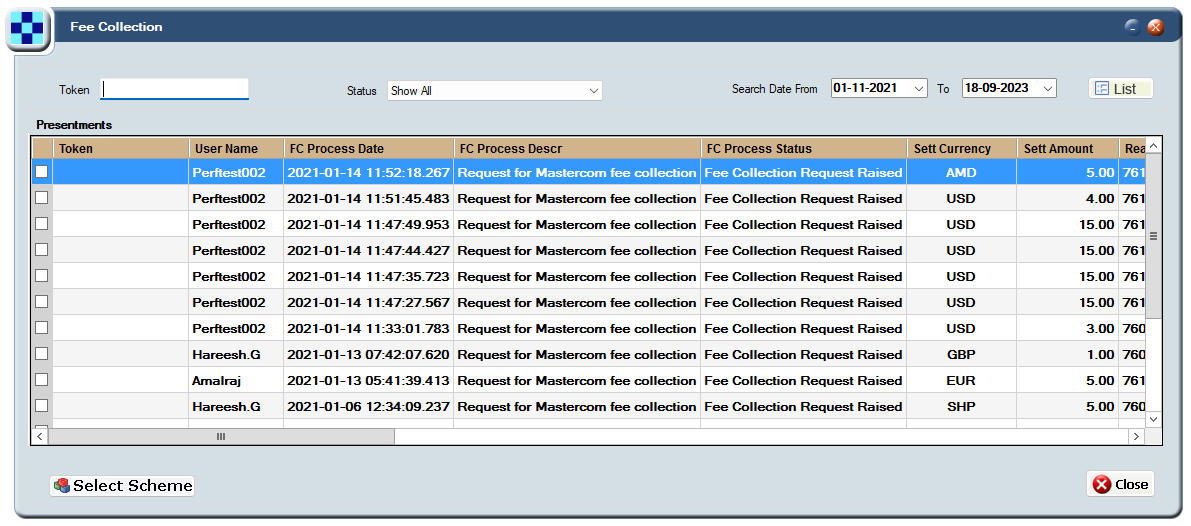
Figure 72: Fee Collection screen
-
To filter the list of fee collection transactions, enter the transaction Token number, select the Status and / or select the Date range.
-
Click List.
10.6 Mastercom SAFE Reporting
10.6.1 Creating a Mastercom SAFE Report
Mastercard require all card issuers to report fraudulent transactions, and you should always do this before raising a chargeback in instances where the reason code is related to a fraudulent transaction. You can report fraudulent transactions to Mastercard by creating a new fraud event in Mastercom, using their SAFE reporting facility.
To create a SAFE report:
-
From the Smart Client menu, select Card Activity > View Transactions to view the Transactions screen.
-
From the Transactions screen, right-click the required transaction and select Create Mastercom SAFE report. The Create Mastercom SAFE report screen is displayed.
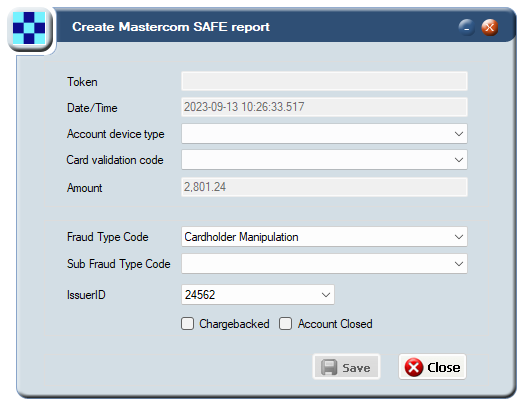
Figure 73: Create Mastercom SAFE report screen
-
Provide all the details as per the instructions in the table below and click Save.
A confirmation message is displayed, indicating if the SAFE Report request was successfully registered with Mastercom. In this case a Claim ID and Fraud ID are returned, which you can use to track the status of the request. If the SAFE Report request failed, a message box is displayed, providing details of the error. For example, an invalid claim ID. Please resolve the error and try again or contact Thredd support.
-
To close the message box, click OK.
-
The created fee collection message is displayed in the SAFE Report Details Screen. See Viewing SAFE Report Details.
About Mastercom SAFE Report fields
|
SAFE Report Option |
Description |
|---|---|
|
Token |
Displays the unique token linked to the card PAN on which the transaction was made. |
|
Date/Time |
Displays the date-time stamp of the transaction. |
|
Account device type |
Select an option. |
|
Card validation code |
Select an option. |
|
Amount |
Displays the transaction amount. |
|
Fraud Type Code |
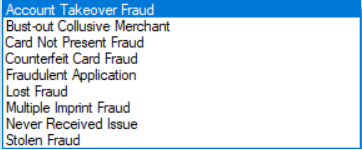
Select a fraud type option.
|
|
Sub Fraud Type Code |
Select a sub-fraud type code. Options include:
|
|
Issuer ID |
Displays the card issuer ID. |
|
Charged Back |
Tick this option if the transaction is Charged Back. |
|
Account Closed |
Tick this option if the account has been closed. |
10.6.2 Viewing SAFE Report Details
This option enables you to view details of all SAFE reports submitted to Mastercom.
-
From the Smart Client menu, select, Management Reports > Safe Report Details to display the Safe Report Details screen.
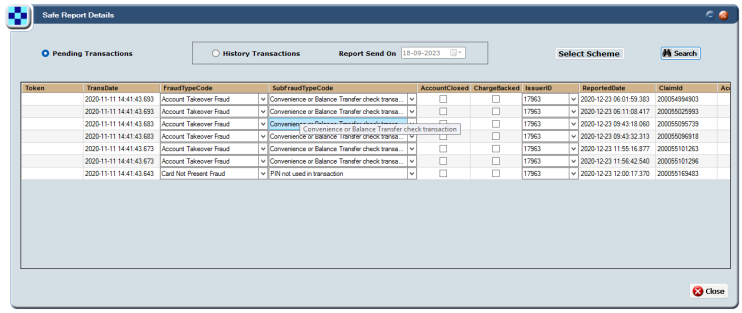
Figure 74: Safe Report Details screen
-
To view only pending transactions, select the Pending Transactions option.
Alternatively, to filter the list of historical transactions, select the History Transactions option and select the Date range.
-
Click Search.