Setting up password login to Thredd applications
Clients who do not have their own Single Sign-On (SSO)-compliant solution (such as Entra, Google, or Okta) can manually add users and set up their password-based access to Thredd Portal.
A Super Admin can set up and manage the settings for your organisation's applications, certificates, and users through Thredd Portal. An Organisation Admin also has these permissions, except those for managing users.
This guidance assumes that you are the Super Admin and need to log in to Thredd Portal for the first time. You can manually add users and set up password-based access when Thredd sends an email to the Super Admin user notifying them that it is ready for your organisation to do this.
For best practice, Thredd recommends that you first set up your organisation's access in the test (UAT) environment, so that you can verify that your organisation can use Thredd applications and API endpoints successfully. You can then set up users later.
About password (non-SSO) user access
Adding new users who will use a password to access the Thredd platform is a manual process. It requires an Admin to manually create and invite each individual user via Thredd Portal, which sends email to users inviting them to log in. Offboarding users is also a manual process, requiring Admin users to revoke access for an individual user via Thredd Portal.
As an optional alternative, Thredd recommends that you configure Single Sign-On (SSO) access to Thredd. This enables you to automate user onboarding, where your users can visit the Thredd Portal URL and automatically create their account upon their first successful login. This eliminates the need to manually create and invite users.
Prerequisites
-
You must have the Super Admin role for your organisation.
-
You must have received confirmation from Thredd that you can start setting up your organisation's users.
Step 1. Log in to Thredd Portal for the first time
When Thredd has completed the initial step of registering your organisation and Super Admin user, it sends two emails to the Super Admin:
-
An invitation containing a link to log in to Thredd Portal and set up your access.
-
A separate email that contains your temporary password that you must use to log in to Thredd Portal.
You need to refer to both emails during the following process to log in to Thredd Portal for the first time.
-
Click on the link in the email for Log in to Thredd Portal. This directs you to the initial access screen.
-
Enter the temporary password from the other email; this is the only password that you can use to gain access initially. Copy the temporary password and paste it into the field under Temporary password. Then select Next.

Figure: Provide temporary password screen for Thredd Portal
-
On the next screen, you must create a new password. The password must be at least eight characters in length. Enter and confirm the new password in the separate fields, and then select the Save and Continue button.
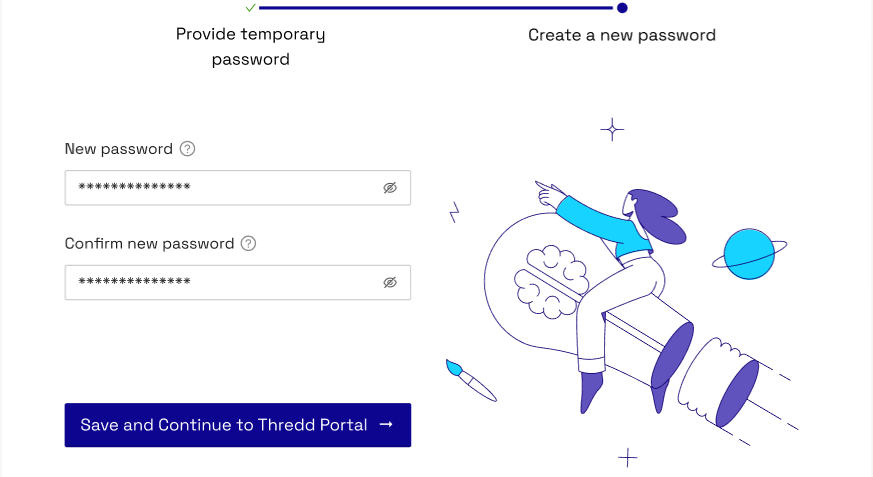
Figure: Create a new password screen for Thredd Portal
When you log in to Thredd Portal, you can set up access for your organisation's users whenever you are ready.
If the link does not work or you need support, use the link at the bottom of the emails to contact Thredd. Do not reply to the email. It is system-generated and sent from a notification-only address that cannot accept incoming emails.
Step 2. Add users and configure their roles in the Thredd platform
A Super Admin user must add the details of other users at your organisation to ensure that they have access to the Thredd platform. A Super Admin can add, edit and remove users, including additional Admin users if your organisation requires this. You can either add additional users in the same flow or an Admin user can add other users later via System Admin > User Management.
While you must manually add and invite users who require access, you can complete this task when you are ready to do so. For example, if you want to first test your organisation's connection to the Thredd platform, such as to REST APIs, and then return to this step.
To add a new user immediately:
-
Select Add New Users.
-
The Add new users screen appears. Enter the user's first and last names, and email address.
-
Next, assign a role to the user. The platform assigns all users a Read-Only role by default which allows view-only access to cards and transactions. You can assign a different role to the user, and assign more than one role, as appropriate:
-
Admin Roles: Admin, Sensitive Information Manager
-
Developer Roles: Developer
-
Cards & Transactions Roles: Cards Operations Specialist, Card Config Manager, Card Balance Manager
-
Read-Only Roles: Read-Only
To learn more, see Understanding Roles.
-
-
When you have entered the user details, you can save them or add additional users in the same flow. If you want to add additional users, select Add Another User and repeat the process. If you are finished adding users, select Continue. You can also add other users later.
-
The Review and Finish screen appears. If all user details are correct, select Confirm and finish. To make a change, select Previous step to return to the Add new users screen.
-
When you return to the User Management screen, you can check if the new user details have been added successfully.
After an Admin user has set up access for their organisation's users, users will receive an email inviting them to log in to Thredd Portal. A user must follow the instructions in the invitation email in order to access the Thredd services appropriate for their role.
Adding a new user via User Management
Admin users can add, view, deactivate and reactivate the users for their organisation in the User Management area of Thredd Portal. You can also edit user details, such as the email address that a user logs in with, and assign the appropriate Thredd Portal Roles to them.
To add or view users:
-
Navigate to System Admin and select User Management.
-
The User Management screen appears, and displays the User Directory and a summary about each user. If you are adding users for the first time, you might only see the Super Admin user in the list.
-
User details — the registered first name, last name, and email address for a user in Thredd Portal.
-
Status — indicates whether users have logged in, changed their password and are active in Thredd Portal after receiving their invitation.
-
Organization — the organisation that the user belongs to.
-
Actions — the action menu for each user, which you can use to review or edit the details and role of a user.
-
-
To add a user, select Invite User.

Figure: User Directory screen in Thredd Portal
-
The Create New User screen appears. Enter the user's email address, and first and last names, and then select Next.
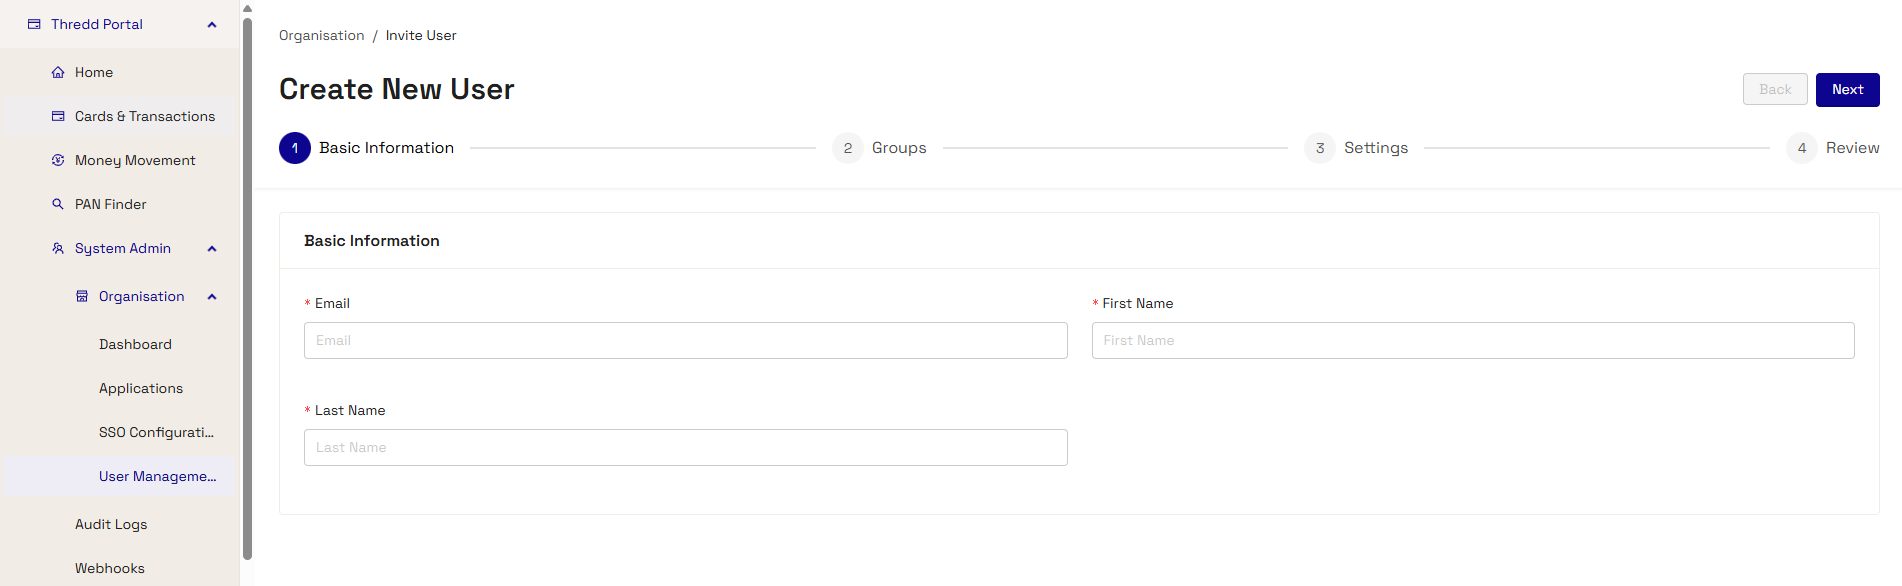
Figure: Create New User screen in Thredd Portal
-
Assign a Thredd Portal Role to a user. The platform assigns all users a Read-Only role by default which allows view-only access to cards and transactions. You can assign a different role to the user, and assign more than one role, as appropriate:
-
Admin Roles: Organisation Admin, Sensitive Information Manager
-
Developer Roles: Developer
-
Cards & Transactions Roles: including Cards Operations Specialist, Card Configuration Manager, Card Balance Manager
-
Manager Roles: Manager
-
Read-Only Roles: Read Only
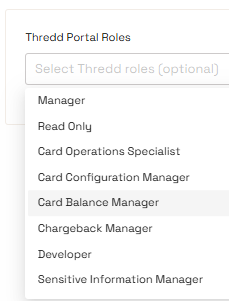
Figure: Thredd Portal Roles selection menu for a user profile
-
-
Continue to follow the prompts in the New User flow, and review the user details. If correct, save the new user profile.

Figure: Create New User progress screen in Thredd Portal
Editing an existing user profile
A Super Admin can add, edit and remove users. To edit the details of a user:
-
Select the action menu (three dots) for an individual user.
-
Select Edit User.
-
The Edit User screen appears and displays the user's name, email address, and the role assigned to the user. You can view a list of the roles available to a user under Roles.
The platform assigns all users a Read-Only role by default which allows view-only access to cards and transactions. You can assign a different role to this if required, and you can also assign more than one role to a user.
-
To change the assigned role, select the role that is most appropriate for the user based on its description.
-
Select Next.
-
The Review User Details screen appears. If correct, select Save. To make a change, select Back to return to the Edit User screen.
-
When you are ready to save the details, select Save. A message appears to confirm that the user details have been updated successfully.
Deactivating a user will revoke their access to the Thredd platform. If you need to restore access, you can reactivate a user.