Setting up Single Sign-On access to Thredd applications
Using Single Sign-On (SSO) enables you to automate user onboarding; you can invite users to log in to Thredd Portal URL and automatically create their accounts. This eliminates the need to manually add and invite users in Thredd Portal.
A Super Admin can set up and manage the settings for your organisation's applications, certificates, SSO configuration, and users through Thredd Portal. An Organisation Admin also has these permissions, except user access.
This guidance assumes that you are the Super Admin and need to log in to Thredd Portal for the first time. You can set up Single Sign-On (SSO) when Thredd sends an email to the Super Admin user notifying them that it is ready for your organisation to do this.
For best practice, Thredd recommends that you first set up your organisation's access in the test (UAT) environment, so that you can verify that your organisation can use Thredd applications and API endpoints successfully. You can then set up users later.
Prerequisites
-
You must have the Super Admin role for your organisation in Thredd Portal.
-
You must have received confirmation from Thredd that your organisation is ready to set up SSO.
-
You must know your SSO protocol details to configure SAML (Security Assertion Markup Language) or OIDC (OpenID Connect).
Step 1: Log in to Thredd Portal for the first time
When Thredd has completed the initial step of registering your organisation and Super Admin user, it sends two emails to the Super Admin:
-
An invitation containing a link to log in to Thredd Portal and set up your access.
-
A separate email that contains your temporary password that you must use to log in to Thredd Portal.
You need to refer to both emails during the following process to log in to Thredd Portal for the first time.
-
Click on the link in the email for Log in to Thredd Portal. This directs you to the initial access screen.
-
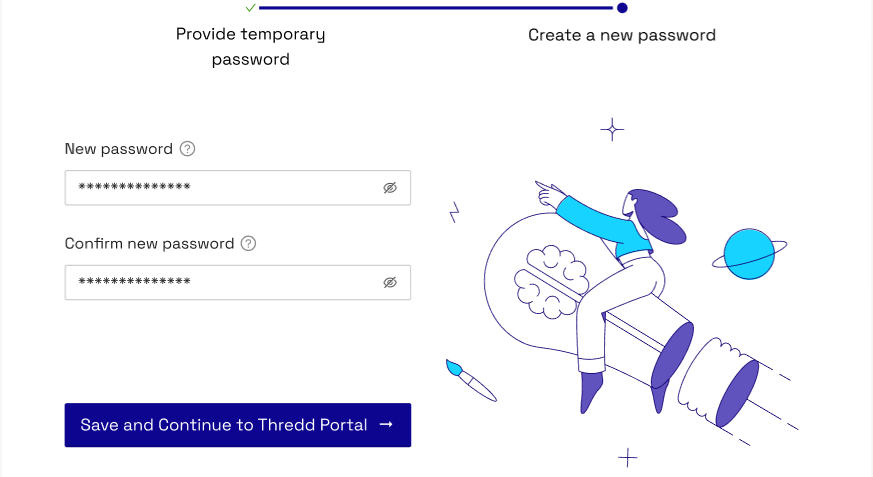
Enter the temporary password from the other email; this is the only password that you can use to gain access initially. Copy the temporary password and paste it into the field under Temporary password. Then select Next.

-
On the next screen, you must create a new password. The password must be at least eight characters in length. Enter and confirm the new password in the separate fields, and then select the Save and Continue button. You can now start the SSO Setup.
If the link does not work or you need support, use the link at the bottom of the emails to contact Thredd. Do not reply to the email. It is system-generated and sent from a notification-only address that cannot accept incoming emails.
Step 2: Confirm your SSO setup in Thredd Portal
Next, you can select and configure your preferred method for Single Sign-On access to the Thredd platform.
You can also check and manage SSO settings via System Admin > SSO Configuration in Thredd Portal.
-
In the SSO setup screen, provide the details for your organisation and SSO protocol. This allows Thredd to automatically verify the identity of your organisation and its users when they access the Thredd platform. Select either SAML or OIDC.
-
SAML — confirm the metadata delivery mode and any required information, either:
-
Fetch from URL: Provide the metadata delivery URL — locate it in your organisation's identity provider settings.
-
File or RAW XML: If the information is not already saved here, upload the file. You can upload only one file.
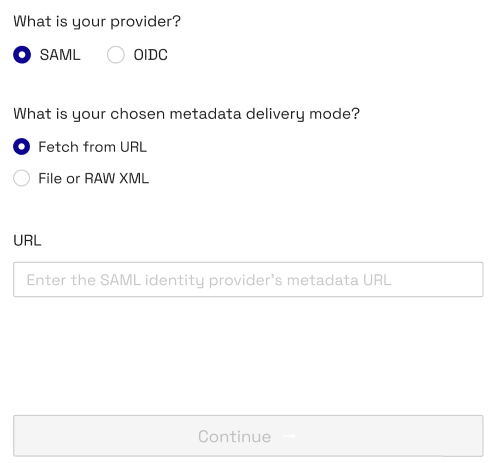
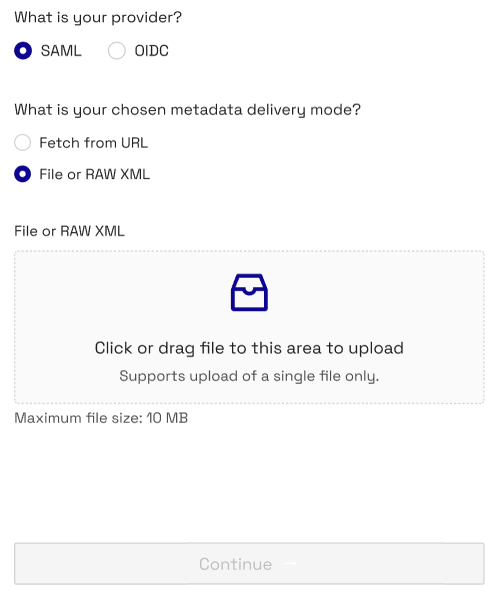
Figure: SAML using Fetch from URL, and SAML using File or RAW XML
-
-
OIDC — confirm the Issuer ID, Client ID, and Authentication Method. For the Authentication Method, specify one of the following:
-
Client Secret: Provide the Client Secret — this method involves sharing a symmetric password between the Client and Server.
-
Private Key JWT: Provide the Client Private Key (PEM format), Algorithm, Expires in (the period of time in hours, minutes and seconds that the client assertion is valid for), and the Redirect URL. This method is an asymmetric method where the client signs a token with a private key, which the Server validates using a registered public key.
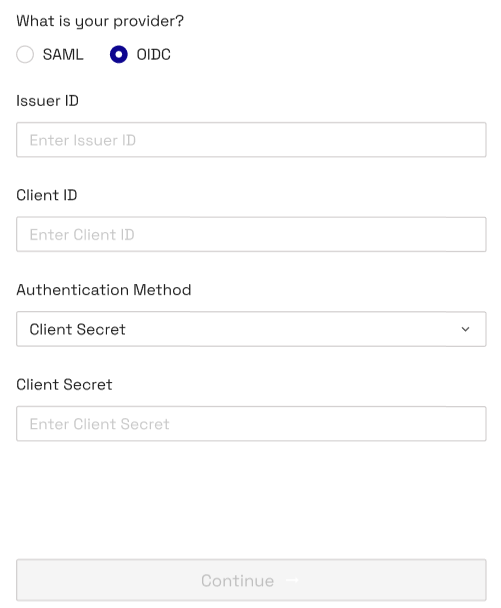
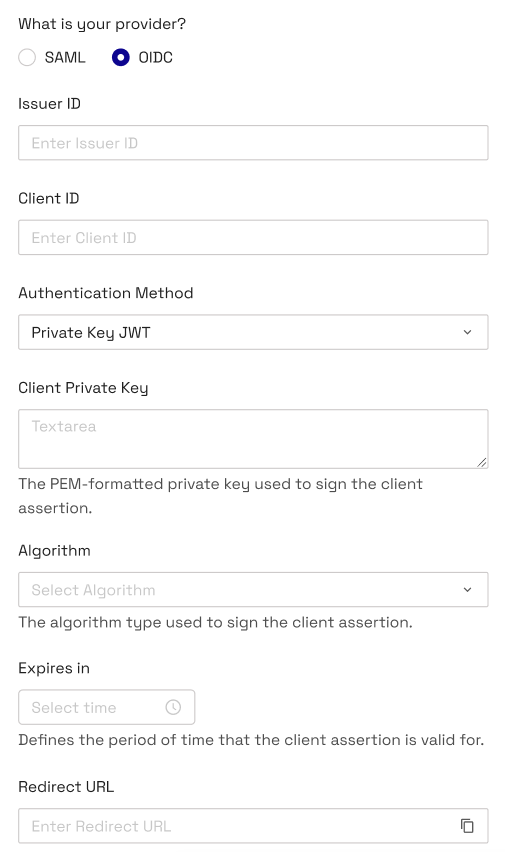
Figure: OIDC using Client Secret, and OIDC using Private Key JWT
-
-
-
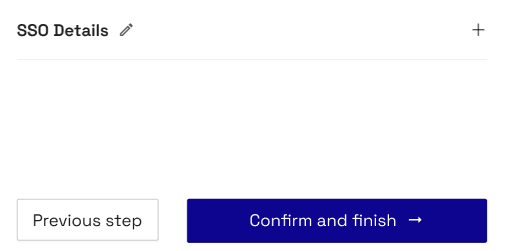
Review your details before saving to make sure that everything is correct. If you need to edit details, select the pencil icon.
-
After you have confirmed your SSO settings, you can log in to Thredd Portal using SSO.

-
When you log in to Thredd Portal, the welcome screen offers the option to manage users immediately. You can do this now (see Step 3) or return to this step later and instead set up access for your organisation to the Thredd API Hub (see Connecting to the REST APIs).

Step 3: Configure user access to the Thredd platform
To ensure that the users for your organisation can access the Thredd platform, you must invite users via your SSO provider. When a new user tries to log in to Thredd Portal, it registers them and assigns the Read-Only role by default.
A Super Admin can view the users that are registered for their organisation in Thredd Portal, and complete the following tasks:
-
Manage user access, deactivate or reactivate a user's access to the platform.
-
Assign the appropriate roles and permissions to a user.
-
Edit user details, such as the email address that a user logs in with.
-
Resend invitations to users.
You must ensure that you configure access for any users who require it, but you can complete this task when you are ready to do so. For example, if you want to first test your organisation's connection to Thredd, such as the REST APIs, and then return to this step.
To view and manage users:
-
Navigate to System Admin and select User Management.
-
The User Management screen appears, and displays a directory of users by default.
-
The Users screen displays a summary of information about each user in the following columns:
-
User ID
-
First Name
-
Last Name
-
Email Address
-
Role — displays all roles assigned to a user, which can be more than one role.
-
Status — indicates if a user has logged in to Thredd Portal and is active after receiving an invitation and changing their password.
-
Last logged in
-
IP Address
-
Actions — the action menu for each user, which you can use to review or edit the details and role of a user.
-
-
To edit the details for a user, select the action menu (three dots) for an individual user and select Edit User.
-
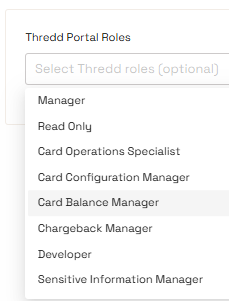
The Edit User screen appears. Make any changes as you require, such as the role assigned to the user under Roles. The platform assigns all users a Read-Only role by default which allows view-only access to cards and transactions. You can assign a different role, and you can also assign more than one role to a user, as appropriate. Available roles include:
-
Admin Roles: Admin, Sensitive Information Manager
-
Developer Roles: Developer
-
Cards & Transactions Roles: Cards Operations Specialist, Card Config Manager, Card Balance Manager
-
Read-Only Roles: Read-Only
To learn more, see Understanding Roles.
-
-
When you have made the changes, select Next.
-
The Review User Details screen appears. If the details are correct, select Save. To make a change, select Back to return to the Edit User screen and save the details when you are ready. A message appears to confirm that the user details have been updated.
To add more users, you must invite them via your SSO provider.
Users who will use the cards and transaction management functionality can find information in the Thredd Portal: Cards and Transaction Management Guide.
Checking and managing an existing SSO Configuration
You can review and manage the identity providers for your organisation within the administrator area of Thredd Portal. To review existing details:
-
Select System Admin, and then select the SSO Configuration. The screen displays any existing configurations in a list.
-
To review a specific configuration, select the Actions menu (an icon of three dots), and then select Review Application.
Alternatively, to check the complete details for a specific application:
-
Navigate to System Admin > Applications.
-
Locate the application you want to review, select the Actions menu (an icon of three dots) beside it, and then select View details. It displays the OAuth Clients tab by default, and the Overview tab.
Editing an existing SSO configuration
To edit an SSO configuration from the OAuth Clients tab of an Application:
-
Select the Edit Configuration button.
-
The Edit Configuration screen appears. Review the details in each section, making any changes only as necessary.
-
When you have finished reviewing or editing the details, select OK.
Deleting an SSO configuration
Before proceeding, make sure that you first review the details of the SSO services and have correctly identified which service to delete.
To delete an SSO configuration:
-
Navigate to System Admin > SSO Configuration.
-
Identify the configuration that you want to delete. Select the Actions menu (three dots) beside the configuration, and then select Delete.
-
A screen appears with a message that asks whether you are sure that you want to delete it.
-
If you do not want to proceed, select Cancel.
-
If you do want to proceed with deleting it, select the Confirm and delete button.
-
Deleting an SSO configuration will permanently revoke access for all users that are using it to access the Thredd platform. Therefore, make sure that any users who will continue to need access to the Thredd platform can gain access using an alternative SSO configuration. Alternatively, if you only want to make changes then you can edit the SSO configuration instead.