9 Managing Cards
This topic explains how to perform various actions on specific transactions or tokens, such as removing an authorisation, adjusting a balance, or changing the status of a card.
You use the Actions menu to manage transactions or tokens.
9.1 Viewing Card Actions
To display the Actions menu:
-
Highlight a transaction in the View Transactions screen, then right click.
-
Select Actions to display the available actions. The options shown depend on the type of transaction, so the actions available on authorisations will differ from those for presentments. For example:
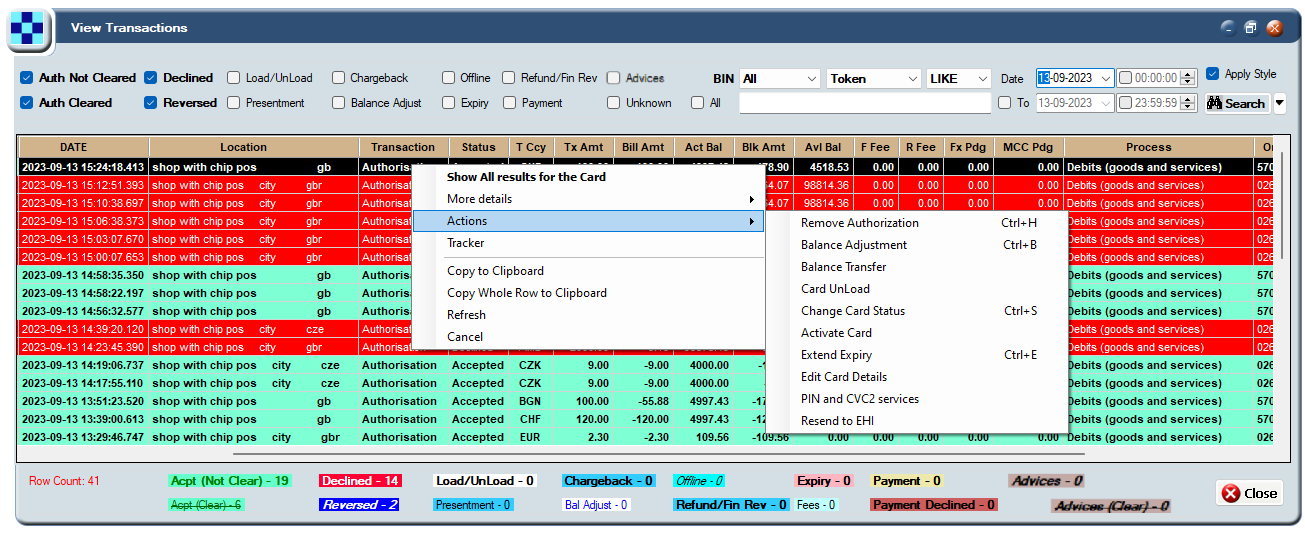
Figure 44: Options available on an authorisation
If you cannot see a menu option, this may be because you do not have the appropriate permissions. For more information, see About Roles and Permissions.
9.2 Removing an Authorisation
You can remove an authorisation on a selected transaction. Removing an authorisation releases the blocked amount related to the authorisation (the auth amount), making it available for the cardholder to spend again.
Removing an authorisation does not prevent the associated presentment from posting on the account. Because of this, use caution as the presentment can bring the account into a negative balance if insufficient funds remain to cover it. If a presentment is received for this authorisation, then another authorisation is created to match the presentment. This authorisation is marked as ‘offline’ as there is no matching un-cleared authorisation.
To remove an authorisation:
-
Highlight a transaction in the View Transactions screen, then right click.
-
Select Actions to display the available actions, then select Remove Authorisation.
-
Add a note, including the JIRA reference, for the audit trail so colleagues can see why an authorisation was removed.
-
Click Remove Now.
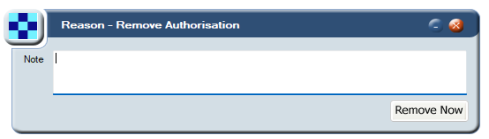
Figure 45: Remove Authorisation screen
9.3 Adjusting a Balance
You can add or remove funds from a cardholder’s balance manually
You can also use the Thredd Web Services APIs to do this (Ws_BalanceAdjustment). For more information, see the Web Services Guide.
To adjust a balance:
-
Highlight a transaction in the View Transactions screen, then right click.
-
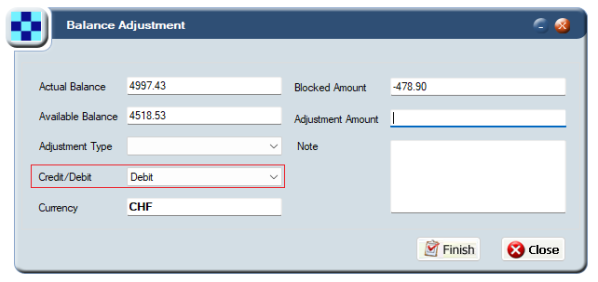
Select Actions to display the available actions, then select Balance Adjustment. The Balance Adjustment screen appears.
-
From the Credit/Debit drop-down box, select Debit or Credit.
-
In Adjustment Type, select the reason for the balance adjustment.
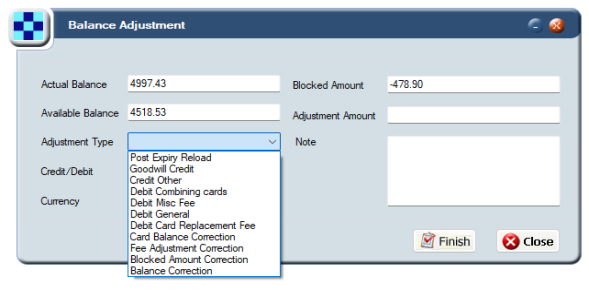
Figure 47: Balance Adjustment screen showing adjustment types
-
In Adjustment Amount, enter the amount the cardholder needs to be credited or debited.
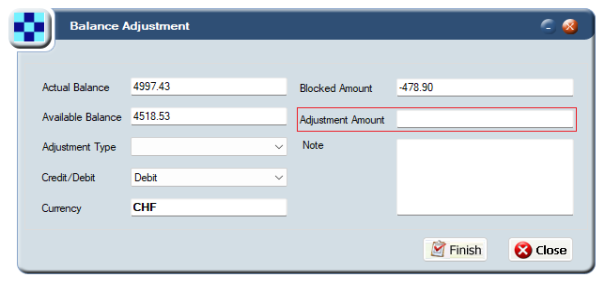
Figure 48: Balance Adjustment screen showing adjustment amount
Ensure this amount is correct as it will cause issues with the balance if input incorrectly.
-
In the Note field, add the reason for the adjustment, including the Jira reference. This is required for audit purposes.
-
Click Finish.
Figure 46: Balance Adjustment screen
9.4 Performing a Balance Transfer
You can transfer part of a balance or the whole balance from one card to another. For example, you may need to transfer a balance if a card is reported stolen. You can also apply any associated fees using the Card Load Fee options.
To perform a balance transfer:
-
Highlight a transaction in the View Transactions screen, then right click.
-
Select Actions to display the available actions, then select Balance Transfer. The Balance Transfer screen appears showing the actual and available balance on the card, and any blocked amount.
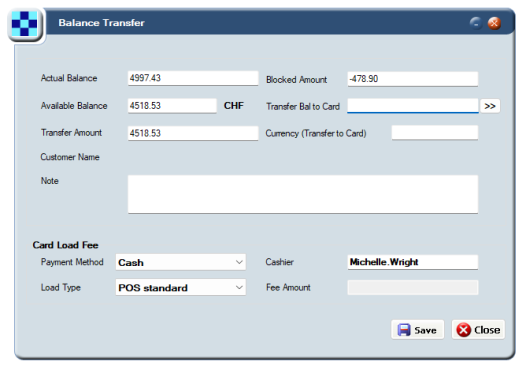
Figure 49: Balance Transfer screen
-
Enter the amount you want to transfer in Transfer Amount.
-
In Transfer Bal to Card, click the arrow and specify the token you want to transfer the balance to.
-
If the type of transfer falls under a fee group applied to that token, the Card Load Fee shows the fee applied to the balance transfer.
-
Click Save.
9.5 Performing a Card Unload
You can unload a specified amount from an account using Card Unload. For example, you may need to do this if you are closing an account.
To perform a card unload:
-
Highlight a transaction in the View Transactions screen, then right click.
-
Select Actions to display the available actions, then select Card Unload. The Card Unload screen appears.

Figure 50: Card Unload screen
-
In Unload Amount, specify the amount you want to unload from the card. You cannot unload more than the available balance.
-
Add a note for audit purposes (optional but recommended).
-
Click Finish.
9.6 Changing the Status of a Card
You can change the status of a card using Change Card Status. For example, you may need to do this if a card is reported as lost or stolen. Each card status has a different effect on how the card can be used. For a full list of card statuses, see Appendix B: Card Status Codes.
You can also use the Thredd Web Service APIs to do this (Ws_StatusChange). For more information, see the Web Services Guide.
To change the status of a card:
-
Highlight a transaction in the View Transactions screen, then right click.
-
Select Actions to display the available actions, then select Change Card Status. The Status Change screen appears.
-
From the Change Card Status To drop-down box, select a card status.
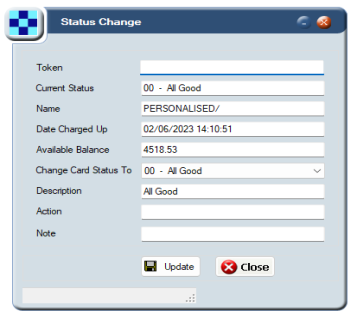
Figure 51: Status Change screen
If you attempt to apply an incorrect or unsupported card status, the Action field displays the reason and the status that Smart Client will apply.
- Add a note for audit purposes.
- Click Update to apply the status change.
-
Most statuses are reversible (except for 83 – Card Destroyed, and 43 - stolen).
-
All statuses other than 00 will prevent the card from being used over the Mastercard
-
Do not use 01 – Refer to Card Issuer or 54 – Expired Card; these are for Thredd use only.
-
Changing the status to 99 (card voided) or 98 (refund to customer) automatically generates a card balance adjustment down to 0.00. A negative balance must be manually adjusted to 0.00.
-
Where MDES or VDEP is in place and a cardholder is using, for example Apple Pay, G Pay, Fitbit Pay, Sony Pay, Mont Blanc Pay or similar, the DPAN Token (Device PAN token) can have a different status to the FPAN (Funding Primary Account Number — the PAN on the physical card).
9.7 Activating a Card
You can activate a card using the Activate Card option. Once a card has been activated it cannot be deactivated using this option.
When converting a virtual card to physical, you can use this option to activate the physical card.
To activate a card:
-
Highlight a transaction in the View Transactions screen, then right click.
-
Select Actions to display the available actions, then select Activate Card.
-
In Note, provide a reason for the activation.
-
Click Save.

Figure 52: Activate Card screen
9.8 Extending the Expiry Date
You can extend the period that a card is valid for using the Extend Expiry option. For example, you may want to do this to extend the expiry date on a gift card.
This updates the expiry date held on the Thredd platform. Use caution because this may cause a mismatch between this date and the expiry date embossed on the card.
To extend the expiry date:
-
Highlight a transaction in the View Transactions screen, then right click.
-
Select Actions to display the available actions, then select Extend Expiry.
-
In New Thredd Expiry, click the arrow and specify the new expiry date.
-
In Note, provide a reason for the extension.
-
Click Save.
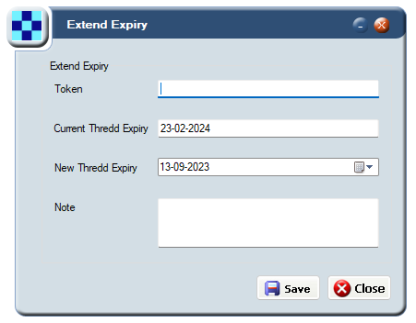
Figure 53: Extend Expiry screen
9.9 Editing Card Details
You can edit the cardholder details and change the rules governing card acceptance methods using the Edit Card Details option. For example, you can prevent a card from being used on gambling sites by disallowing a specific Merchant Category Code (MCC).
To edit card details:
-
Highlight a transaction in the View Transactions screen, then right click.
-
Select Actions to display the available actions, then select Edit Card Details. The Card Master screen appears.
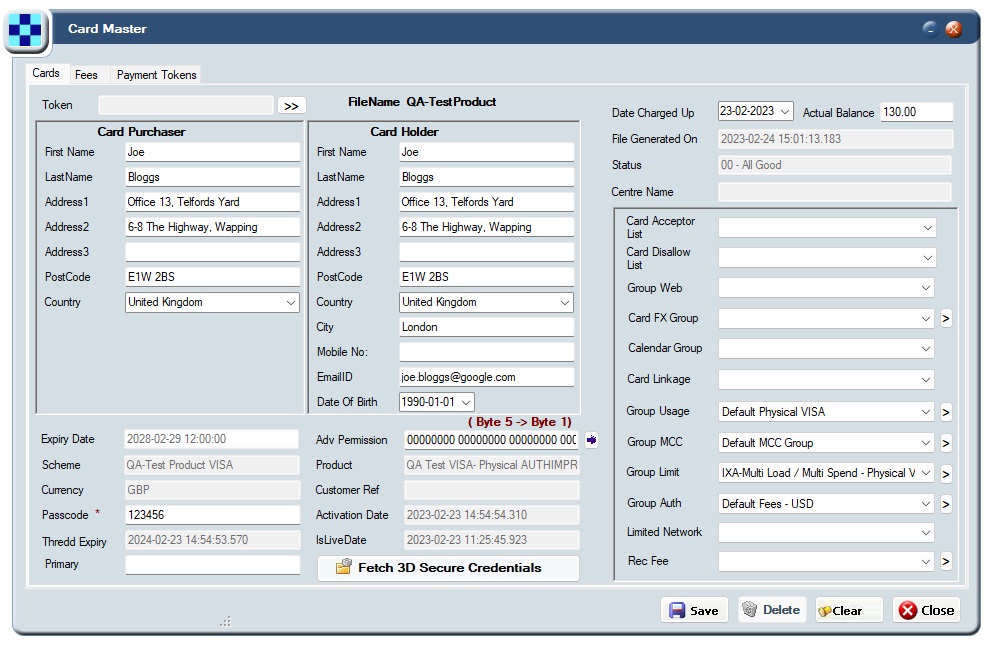
Figure 54: Editable Card Master screen
For more information about the information on this screen, see Viewing Card Details.
Click the arrow adjacent to some fields to display more information, for example, Group Limit.
-
After making your changes, click Save.
For information about configuring fees, and payment tokens using the Fees and Payment Tokens tabs, see Viewing card fees, and fee settings and Viewing payment tokens.
9.10 Unblocking a PIN
You can unblock a PIN and send the PIN via an SMS message to a cardholder using the PIN and CVC2 Services option.
The PIN stored on the card’s chip is called the offline PIN. The PIN stored on the Thredd system is the online PIN.
To unblock a PIN:
-
Highlight a transaction in the View Transactions screen, then right click.
-
Select Actions to display the available actions, then select PIN and CVC2 Services.
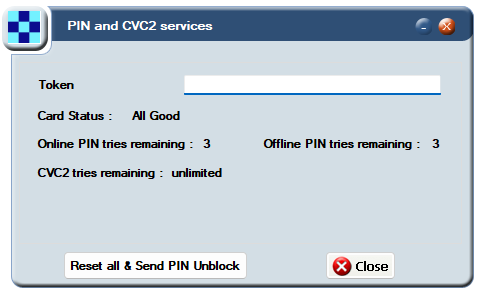
Figure 55: PIN and CVC2 services screen
The following information is shown:
-
Card Status — the card's status. For a full list of card statuses, see Appendix B: Card Status Codes.
-
Online PIN tries remaining — the number of online PIN attempts left. The limit is three consecutive incorrect attempts. Online PIN checks are counted when the PIN is checked against the PIN stored in the Thredd system, not the PIN of the chip.
-
Offline PIN tries remaining — the number of offline PIN attempts left as received from the card on the last online transaction. The actual value is held inside the chip and could be different to the last one sent to Thredd. The limit is three consecutive incorrect attempts. Offline PIN checks are made between the POS terminal and the chip (chips store the PIN, eliminating the need to do an online PIN verification).
-
CVC2 tries remaining — the number of Card Validation Code (CVC) attempts left.
If the offline PIN is blocked, the card will decline at the POS terminal. In this circumstance, the decline may not show in Smart Client (this can happen because the chip informs the POS terminal that the PIN limit has been exceeded). The Thredd system is updated only when the card is used at an online EMV-capable terminal.
9.10.1 Sending a PIN Unblock
You can send the PIN via SMS to a cardholder using SMS Pin To Card Holder. This automatically generates a script that gets queued. As soon as the card is used at an online EMV terminal, the script is sent to the card where it unblocks the PIN counter on the chip. During this procedure, the card will decline the first transaction.
If multiple transactions decline due to an incorrect PIN, repeat the procedure to send another PIN unblock script and ask the cardholder to use another POS (preferably an ATM). To check whether a card was used at an EMV-capable terminal, refer to the POS Data (DE061) field. See Examining a Transaction in Detail.
9.10.2 Resetting all and sending a PIN unblock
The offline PIN and online PIN can become out-of-sync in the event a cardholder changes their PIN at an offline terminal then uses their card at an online terminal that does not recognise the change.
To unblock the online PIN and reset all online and offline PIN and CVC2 tries back to zero (if these are not set to unlimited)
-
Highlight a transaction in the View Transactions screen, then right click.
-
Select Actions to display the available actions, then select PIN and CVC2 Services
-
Click Reset all and send PIN unblock.
9.11 Resending a Transaction to EHI
This feature is available on request. For information, contact your Thredd Account Manager.
You can resend a transaction (an EHI Message) to your External Host Interface (EHI) using the Resend to EHI option. This immediately resends the selected transaction (for example, an Authorisation or Presentment) to the EHI. For example, if an EHI timeout occurred for a minute due to downtime, you may need to resend a transaction that happened during that time to EHI. For more information, see the External Host Interface (EHI) Guide.
To resend a transaction to EHI:
-
Highlight a transaction in the View Transactions screen, then right click.
-
Select Actions to display the available actions, then select Resend to EHI.
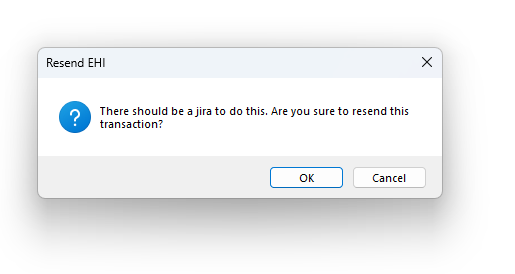
Figure 56: Resend to EHI message.
-
Click OK to proceed. The transaction’s EHI message is resent to your host.
9.12 Viewing Card History
You can view a history of all the actions applied to a card using the Tracker option. This shows actions including:
-
Date of activation
-
Group changes
-
Card status changes
-
Other actions taken against the card, with details about the user who performed the action.
To view card history:
-
Highlight a transaction in the View Transactions screen, then right click.
-
Select Tracker to display the Tracker History screen.
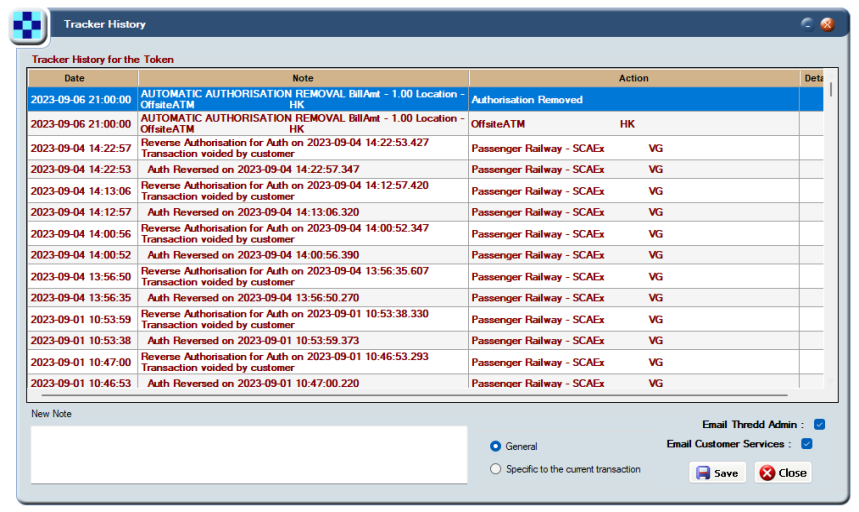
Figure 57: Tracker History screen showing a history of all the actions applied to a token
Use the scroll bar to see all the information.
9.12.1 Adding a note to a transaction
You can add a note to a transaction which will be visible in the Tracker History screen in Smart Client.
The note is informational only and is not sent via the External Host Interface or shared with your own systems.
To add a note to the transaction:
-
Highlight a transaction in the View Transactions screen, then right click.
-
Select Tracker to display the Tracker History screen.
-
Input the message into New Note (bottom-left of the screen).

Figure 58: Adding a new note to a transaction in the Tracker History screen.
-
To apply the note to this particular transaction, select Specific to the current transaction.
-
Click Save. The note is appended to the transaction.