2 Getting Started with Smart Client
This topic provides a high-level overview of the steps to help you get up and running with Smart Client, with pointers to where to find further information.
Step 1 – Install and launch Smart Client
Smart Client is installed as a desktop application and requires a secure connection to Thredd systems.
-
For information about system requirements and installation, see Installing Smart Client.
-
For information about launching the application, how to navigate the main screens, and about roles and permissions, see Launching Smart Client.
Step 2 - Enter OTP Code
Enter the OTP code in Smart Client to provide an added layer of protection through Multi-Factor Authentication (MFA). When logging in to Smart Client, a window displays requesting the six-digit One-Time Password (OTP) that is sent to the user's email address. This password is valid for 15 minutes and must be entered to complete the login process. When you have entered the OTP value from the email, click Validate.
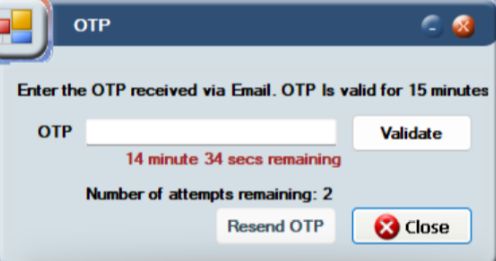
A user has a total of six attempts to log in successfully to Smart Client. When all attempts to log in have been exhausted, the user account is locked and you will need to contact Thredd support to unlock the account.
If you do not receive an email with the OTP code, click Resend OTP to send the email again. This button is greyed out for the first 60 seconds after Thredd sends an email. You are allowed to press the button three times before the functionality to send the OTP is disabled. A message on the window displays how many attempts for resending an OTP are left.
Step 3 – Search for a card or transaction
Smart Client provides powerful search functions and filters to help you find specific cards and transactions.
-
For information about searching for a specific card, see Searching for a Card.
-
For information about searching for transactions, see Searching for a Transaction.
Step 4 – View card and transaction details
Smart Client provides detailed information about each card and transaction and the ability to drill down deeper. For example, you can view information about a card’s status, limits, fees, and spending history, or all the transactions made using the card.
-
For information about viewing card details, see Viewing Card Details.
-
For information about viewing transaction details, see Viewing Transaction Details.
Step 5 – Manage cards
Depending on your role, you can perform various actions on a specific transaction or token, such as removing an authorisation or adjusting a balance. You can also manage chargebacks and MDES/VDEP-enabled cards.
-
For information about managing cards, see Managing Cards.
-
For information about viewing, creating, and managing chargebacks, see Managing Chargebacks.
-
For information about dealing with MDES/VDEP-enabled cards, see Managing MDES/VDEP cards.